 Service基础
# 1. Service简介
# 什么是Service
Service表示“服务”,是Android系统的核心组件之一,用来在后台完成时间跨度较大的工作,且没有任何界面。服务可由其他应用组件启动(如Activity),服务一旦被启动将在后台一直运行,即使启动服务的组件(Activity)已销毁也不受影响。 此外,组件可以绑定到服务,以与之进行交互,甚至是执行进程间通信 (IPC)。 例如,服务可以处理网络事务、播放音乐,执行文件 I/O 或与内容提供程序交互,而所有这一切均可在后台进行,Service基本上分为两种形式:
1. 启动状态 当应用组件(如 Activity)通过调用 startService() 启动服务时,服务即处于“启动”状态。一旦启动,服务即可在后台无限期运行,即使启动服务的组件已被销毁也不受影响,除非手动调用才能停止服务, 已启动的服务通常是执行单一操作,而且不会将结果返回给调用方。
2. 绑定状态 当应用组件通过调用 bindService() 绑定到服务时,服务即处于“绑定”状态。绑定服务提供了一个客户端-服务器接口,允许组件与服务进行交互、发送请求、获取结果,甚至是利用进程间通信 (IPC) 跨进程执行这些操作。 仅当与另一个应用组件绑定时,绑定服务才会运行。 多个组件可以同时绑定到该服务,但全部取消绑定后,该服务即会被销毁。
"后台":没有和界面关联
- Service的本质是一个继承了
andriod.app.Service的JAVA类; - 每一个Service都应该在AndroidManifest.xml中进行注册
- Service由Android系统进行维护
Service没有匹配的用户界面,通常用于在后台执行耗时操作
Service是运行在主线程中的,不允许在主线程中执行耗时操作
尽管Service被定位为“用于处理耗时操作”,但是各种耗时操作需要在Service中另外开辟线程来完成。
组件可以绑定到Service,实现进程间通信(IPC:Inter Process Communication)。
注意:Service不是 线程 或 单独的进程;Service依赖于创建Service的应用进程,当进程被杀掉,Service也会停止运行
# 使用Service类
MyService : Service() {
    override fun onBind(intent: Intent?): IBinder? {
        TODO("Not yet implemented")
    }

    override fun onCreate() {
        super.onCreate()
    }

    override fun onStartCommand(intent: Intent?, flags: Int, startId: Int): Int {
        return super.onStartCommand(intent, flags, startId)
    }

    override fun onDestroy() {
        super.onDestroy()
    }
}
2
3
4
5
6
7
8
9
10
11
12
13
14
15
16
17
onCreate: Service创建时调用,首次创建服务时,系统将调用此方法来执行一次性设置程序 [在调用 onStartCommand() 或 onBind() 之前];如果服务已在运行,则不会调用此方法。该方法只被调用一次onStartCommand: Service启动时调用,只要启动就会被回调;onDestroy: Service销毁时调用;服务应该实现此方法来清理所有资源,如线程、注册的侦听器、接收器等,这是服务接收的最后一个调用。onBind(): 当另一个组件想通过调用 bindService() 与服务绑定(例如执行 RPC)时,系统将调用此方法。在此方法的实现中,必须返回 一个IBinder 接口的实现类,供客户端用来与服务进行通信。无论是启动状态还是绑定状态,此方法必须重写,但在启动状态的情况下直接返回 null。
# Service的分类
1. Local Service [本地服务]
Service对象与Service的启动者在同个进程中运行,两者的通信是进程内的通信
2. Remote Service [远程服务]
Service对象与Service的启动者不在同一个进程内,Android通过AID来实现进程间通信
# 进程的优先级
进程的优先级分类如下(从高到低):[包含Service的进程为前三个]
1. 前台进程 Foreground Process
- 正在与用户交互的Activity
- 存在Service,且该Service编订在用户交互的Activity之上
- 存在运行前台的Service,该Service的
startForeground()被调用
2. 可见进程 Visible Process
并无前台组件,但包含用户可见的组件
- 处于暂停态的Activity
- 存于绑定在可见Activity之上得Service
3. 服务进程 Service Process
使用startService()方式启动的Service,但该Service并未上升到前台、可见的级别
4. 后台进程 Background Process
大多表现为onStop()之后的Activity
5. 空进程 Empty Process
不包含任何活动的组件的进程,为了便于缓存组件,以提高下次启动的效率,系统可能仍然展示保留他们
# AndroidManifest中进行声明
Service在AndroidManifest.xml中的声明语法
<service android:enabled=["true" | "false"]
    android:exported=["true" | "false"]
    android:icon="drawable resource"
    android:isolatedProcess=["true" | "false"]
    android:label="string resource"
    android:name="string"
    android:permission="string"
    android:process="string" >
    . . .
</service>
2
3
4
5
6
7
8
9
10
- android:exported:代表是否能被其他应用隐式调用,其默认值是由service中有无intent-filter决定的,如果有intent-filter,默认值为true,否则为false。为false的情况下,即使有intent-filter匹配,也无法打开,即无法被其他应用隐式调用。
- android:name:对应Service类名
- android:permission:是权限声明
- android:process:是否需要在单独的进程中运行,当设置为android:process=”:remote”时,代表Service在单独的进程中运行。注意“:”很重要,它的意思是指要在当前进程名称前面附加上当前的包名,所以“remote”和”:remote”不是同一个意思,前者的进程名称为:remote,而后者的进程名称为:App-packageName:remote。
- android:isolatedProcess :设置 true 意味着,服务会在一个特殊的进程下运行,这个进程与系统其他进程分开且没有自己的权限。与其通信的唯一途径是通过服务的API(bind and start)。
- android:enabled:是否可以被系统实例化,默认为 true因为父标签 也有 enable 属性,所以必须两个都为默认值 true 的情况下服务才会被激活,否则不会激活。

# 2. 启动Service
Android Service 的两种启动方法
服务不能自己运行,需要通过调用**Context.startService()** 或 **Context.bindService()**方法启动服务。这两个方法都 可以启动Service,但是它们的使用场合有所不同。
- 使用
startService()方法启用服务,调用者与服务之间没有关连,即使调用者退出,服务仍然运行。 - 使用
bindService()方法启用服务,调用者与服务绑定在了一起,调用者一旦退出,服务也就终止,大有 “不求同时生,必须同时死” 的特点。
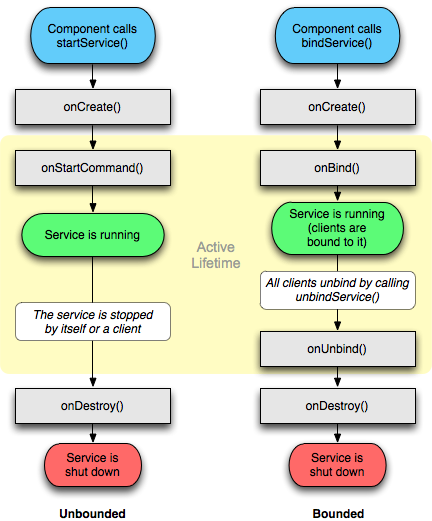
如果打算采用Context.startService()方法启动服务,在服务未被创建时,系统会先调用服务的onCreate()方法,接着调用onStart()方法。如果调用startService()方法前服务已经被创建,多次调用startService()方法并不会导致多次创建服务,但会导致多次调用onStart()方法。采用startService()方法启动的服务,只能调用Context.stopService()方法结束服务,服务结束时会调用onDestroy()方法。
如果打算采用Context.bindService()方法启动服务,在服务未被创建时,系统会先调用服务的 onCreate()方法,接着调用onBind()方法。这个时候调用者和服务绑定在一起,调用者退出了,系统就会先调用服务的onUnbind()方法,接着调用onDestroy()方法。如果调用bindService()方法前服务已经被绑定,多次调用bindService()方法并不会导致 多次创建服务及绑定(也就是说onCreate()和onBind()方法并不会被多次调用)。如果调用者希望与正在绑定的服务解除绑定,可以调用 unbindService()方法,调用该方法也会导致系统调用服务的 onUnbind()–>onDestroy()方法。
# 2.1 Context.startService激活Service
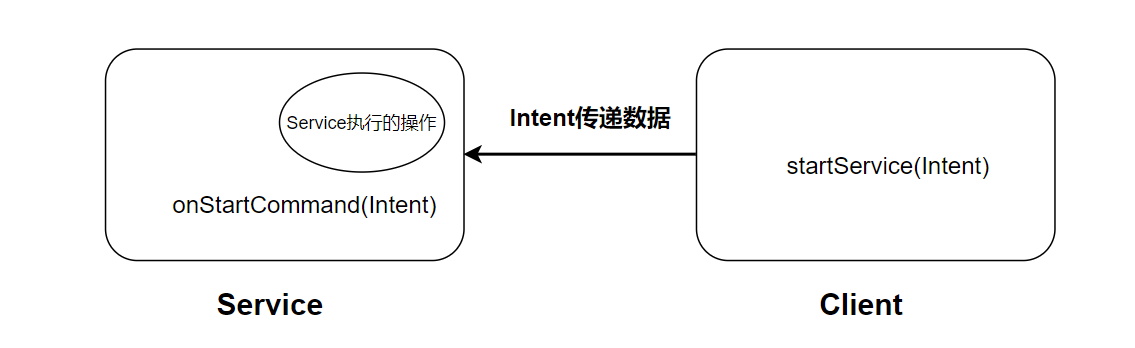
[方式一] 使用startService激活Service组件
直接在客户端,一般是activity中调用startService()方法,传递一个Intent参数,将要传递的数据储存在intent中传递给Service即可,启动服务后会依次调用服务的一些生命周期的回调方法,其中在onStartCommand中执行我们想要服务执行的操作即可,在这个方法中我们可以获得客户端传递过来的Intent获得相关数据[1]
这种方式,通过在Activity中启动、销毁Service,但是二者没有紧密的关联;Service具体执行什么逻辑,Activity是无法控制的。要让其关系密切,就需要采用绑定的方式激活Service
显示或隐式启动Service
- 显示或者隐式Intent都可以激活Service
- 要实现进程间通信,则应该为Service组件配置隐式Intent
context.startService(Intent intent);
context.stopService(Intent intent);
2
Service自我停止运行:Service内部调用 stopSelf()
启动Service的开发流程如下:
创建Java类,继承android.app.Service
Service中定义了抽象方法onBind(),该方法被重写,但不一定需要被
在AndroidManifest.xml中的
<application>下添加<service>子节点,配置创建的Service在Activity中调用
startService(Intent intent)方法启动Service
XML布局
<?xml version="1.0" encoding="utf-8"?>
<androidx.constraintlayout.widget.ConstraintLayout xmlns:android="http://schemas.android.com/apk/res/android"
xmlns:app="http://schemas.android.com/apk/res-auto"
xmlns:tools="http://schemas.android.com/tools"
android:id="@+id/btn_stop_service"
android:layout_width="match_parent"
android:layout_height="match_parent"
tools:context=".MainActivity">
<TextView
android:id="@+id/tv_test_start"
android:layout_width="wrap_content"
android:layout_height="wrap_content"
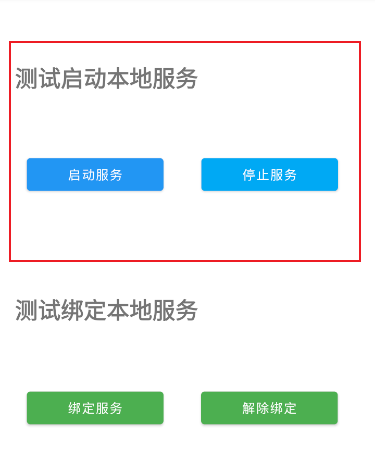
android:text="测试启动本地服务"
android:textSize="25dp"
android:textStyle="bold"
app:layout_constraintBottom_toBottomOf="parent"
app:layout_constraintEnd_toEndOf="parent"
app:layout_constraintHorizontal_bias="0.078"
app:layout_constraintLeft_toLeftOf="parent"
app:layout_constraintRight_toRightOf="parent"
app:layout_constraintStart_toStartOf="parent"
app:layout_constraintTop_toTopOf="parent"
app:layout_constraintVertical_bias="0.1" />
<Button
android:id="@+id/btn_start_service"
android:layout_width="150dp"
android:layout_height="wrap_content"
android:onClick="startServiceTest"
android:text="启动服务"
app:backgroundTint="#2196F3"
app:layout_constraintBottom_toBottomOf="parent"
app:layout_constraintEnd_toEndOf="parent"
app:layout_constraintHorizontal_bias="0.114"
app:layout_constraintStart_toStartOf="parent"
app:layout_constraintTop_toTopOf="parent"
app:layout_constraintVertical_bias="0.243" />
<Button
android:id="@+id/button2"
android:layout_width="150dp"
android:layout_height="wrap_content"
android:onClick="stopServiceTest"
android:text="停止服务"
app:backgroundTint="#03A9F4"
app:layout_constraintBottom_toBottomOf="parent"
app:layout_constraintEnd_toEndOf="parent"
app:layout_constraintHorizontal_bias="0.506"
app:layout_constraintStart_toEndOf="@+id/btn_start_service"
app:layout_constraintTop_toTopOf="parent"
app:layout_constraintVertical_bias="0.243" />
<TextView
android:id="@+id/textView"
android:layout_width="wrap_content"
android:layout_height="wrap_content"
android:text="测试绑定本地服务"
android:textSize="25dp"
android:textStyle="bold"
app:layout_constraintBottom_toBottomOf="parent"
app:layout_constraintEnd_toEndOf="parent"
app:layout_constraintHorizontal_bias="0.078"
app:layout_constraintStart_toStartOf="parent"
app:layout_constraintTop_toTopOf="parent"
app:layout_constraintVertical_bias="0.456" />
<Button
android:id="@+id/btn_bind"
android:layout_width="150dp"
android:layout_height="wrap_content"
android:onClick="bindServiceTest"
android:text="绑定服务"
app:backgroundTint="#4CAF50"
app:layout_constraintBottom_toBottomOf="parent"
app:layout_constraintEnd_toEndOf="parent"
app:layout_constraintHorizontal_bias="0.114"
app:layout_constraintStart_toStartOf="parent"
app:layout_constraintTop_toTopOf="parent"
app:layout_constraintVertical_bias="0.609" />
<Button
android:id="@+id/btn_unbind"
android:layout_width="150dp"
android:layout_height="wrap_content"
android:onClick="unbindServiceTest"
android:text="解除绑定"
app:backgroundTint="#4CAF50"
app:layout_constraintBottom_toBottomOf="parent"
app:layout_constraintEnd_toEndOf="parent"
app:layout_constraintHorizontal_bias="0.505"
app:layout_constraintStart_toEndOf="@+id/btn_bind"
app:layout_constraintTop_toTopOf="parent"
app:layout_constraintVertical_bias="0.609" />
</androidx.constraintlayout.widget.ConstraintLayout>
2
3
4
5
6
7
8
9
10
11
12
13
14
15
16
17
18
19
20
21
22
23
24
25
26
27
28
29
30
31
32
33
34
35
36
37
38
39
40
41
42
43
44
45
46
47
48
49
50
51
52
53
54
55
56
57
58
59
60
61
62
63
64
65
66
67
68
69
70
71
72
73
74
75
76
77
78
79
80
81
82
83
84
85
86
87
88
89
90
91
92
93
94
95
96
Service代码:调用者和Service无关联,调用者退出,Service并未停止,除非调用stopService()
public class ServiceLocal extends Service {

    private final static String TAG = "TAG";

    public ServiceLocal() {
        Log.e(TAG, "ServiceLocal ==> 执行构造,服务被创建啦~");
    }

    @Override
    public void onCreate() {
        super.onCreate();
        Log.e(TAG, "ServiceLocal ==> onCreate");
    }

    @Override
    public int onStartCommand(Intent intent, int flags, int startId) {
        Log.e(TAG, "ServiceLocal ==> onStartCommand");
        return super.onStartCommand(intent, flags, startId);
    }

    @Override
    public void onDestroy() {
        super.onDestroy();
        Log.e(TAG, "ServiceLocal ==> onDestroy");
    }

    @Nullable
    @Override
    public IBinder onBind(Intent intent) {
        Log.e(TAG, "ServiceLocal ==> onBind");
        Binder binder = new Binder();
        return binder;
    }
}
2
3
4
5
6
7
8
9
10
11
12
13
14
15
16
17
18
19
20
21
22
23
24
25
26
27
28
29
30
31
32
33
34
MainActivity代码
public class MainActivity extends AppCompatActivity {

    private ServiceConnection connection;
    private final static String TAG = "TAG";

    @Override
    protected void onCreate(Bundle savedInstanceState) {
        super.onCreate(savedInstanceState);
        setContentView(R.layout.activity_main);
    }

    /**
     * 启动Service
     * @param view
     */
    public void startServiceTest(View view) {
        // 要注册Service
        Intent intent = new Intent(getApplicationContext(), ServiceLocal.class);
        startService(intent);
        Toast.makeText(this, "启动Service", Toast.LENGTH_SHORT).show();
    }

     /**
     * 停止Service
     * @param view
     */
    public void stopServiceTest(View view) {
        Intent intent = new Intent(getApplicationContext(), ServiceLocal.class);
        stopService(intent);
        Toast.makeText(this, "停止Service", Toast.LENGTH_SHORT).show();
    }

    @Override
    protected void onDestroy() {
        super.onDestroy();
        if (connection != null) {
            unbindService(connection);
            connection = null;
            Toast.makeText(this, "解除绑定啦!", Toast.LENGTH_SHORT).show();
        } else {
            // 还未绑定
            Toast.makeText(this, "还未绑定呢...", Toast.LENGTH_SHORT).show();
        }
    }
}
2
3
4
5
6
7
8
9
10
11
12
13
14
15
16
17
18
19
20
21
22
23
24
25
26
27
28
29
30
31
32
33
34
35
36
37
38
39
40
41
42
43
44
45
Logcat查看
top.iqqcode.testservice E/TAG: ServiceLocal ==> 执行构造,服务被创建啦~
top.iqqcode.testservice E/TAG: ServiceLocal ==> onCreate
top.iqqcode.testservice E/TAG: ServiceLocal ==> onStartCommand
top.iqqcode.testservice E/TAG: ServiceLocal ==> onDestroy
2
3
4
# 2.2 绑定模式激活Service
使用绑定的Service可以实现组件与Service的通信。组件与被绑定的Service可以不归属于同一个应用程序,因此通过绑定Service可以实现进程间通信。
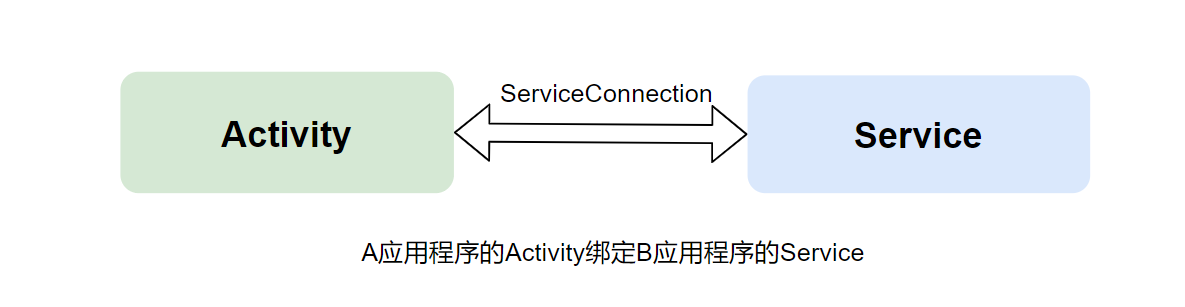
通过绑定服务的方式可以在客户端获得对应Service的引用,从而完成与Service的交互。
调用bindService(Intent service,ServiceConnection conn,int flags)方法即可实现当前组件与Service的绑定。
【参数说明】:
- Intent service: 配置被激活的Sevice组件,该Intent可以是显式的,也可以是隐式的;
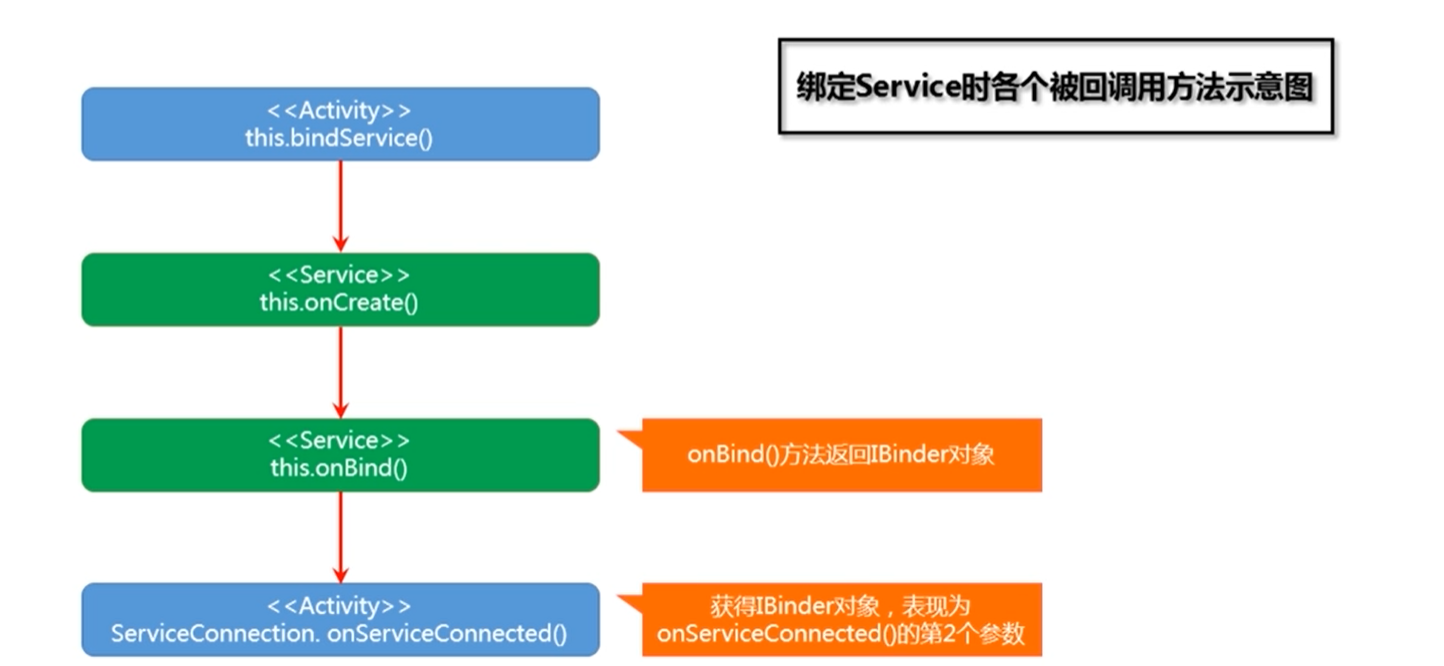
- ServiceConnection conn:当前组件与被激活的Service的连接对象,当成功的以绑定模式激活Service后,该Service的onBind()方法的返回值(非null)对象被会回传到当前组件,即当前组件与被激活的Service存在相同的IBinder对象;
- int flags:标志
关于Service的onBind()方法
当Activity和Service绑定之后,就调用Service里Binder提供的方法了

- 在绑定Service时,定义的Service类中,onBind()方法应该返回一个非null的值。
- onBind()方法的返回值类型是IBinder类型,IBinder是接口,开发人员可以自定义类实现该接口。
Google官方并不推荐开发人员直接定义类实现IBinder接口,而是通过继承Binder类即可,Binder类是IBinder接口的实现类。
- 如果onBind()方法的返回值是null,则该绑定过程是失败的,尽管Service也会执行onCreate()方法开始工作,但其它组件无法与Service通信。
# 实现绑定Service
实现Activity绑定Service的开发步骤如下:
创建JAVA类继承android.app.Service类,并在AndroidManifest.xml中注册该Service;
    <application
        android:allowBackup="true"
        android:icon="@mipmap/ic_launcher"
        android:label="@string/app_name"
        android:roundIcon="@mipmap/ic_launcher_round"
        android:supportsRtl="true"
        android:theme="@style/Theme.01_ServiceLifeCycle">
        <activity android:name=".MainActivity">
            <intent-filter>
                <action android:name="android.intent.action.MAIN" />

                <category android:name="android.intent.category.LAUNCHER" />
            </intent-filter>
        </activity>
        <!--注册Service-->
        <service
            android:name=".ServiceLocal"
            android:enabled="true"
            android:exported="true" />
    </application>
2
3
4
5
6
7
8
9
10
11
12
13
14
15
16
17
18
19
20
在自定义的Service类中创建IBinder的对象,作为onBind()方法的返回值
Service代码
public class ServiceLocal extends Service {

    public ServiceLocal() {
        Log.e(TAG, "ServiceLocal ==> 执行构造,服务被创建啦~");
    }

    @Override
    public void onCreate() {
        super.onCreate();
        Log.e(TAG, "ServiceLocal ==> onCreate");
    }

    @Override
    public int onStartCommand(Intent intent, int flags, int startId) {
        Log.e(TAG, "ServiceLocal ==> onStartCommand");
        return super.onStartCommand(intent, flags, startId);
    }

    @Override
    public void onDestroy() {
        super.onDestroy();
        Log.e(TAG, "ServiceLocal ==> onDestroy");
    }

    @Nullable
    @Override
    public IBinder onBind(Intent intent) {
        Log.e(TAG, "ServiceLocal ==> onBind");
        Binder binder = new Binder();
        return binder;
    }
}
2
3
4
5
6
7
8
9
10
11
12
13
14
15
16
17
18
19
20
21
22
23
24
25
26
27
28
29
30
31
32
在Activity中创建ServiceConnection的对象;
在Activity中调用bindService()方法实现与Service的绑定;
重写Activity的onDestroy()方法,调用unbindService()方法取消与Service的绑定,以避免当Activity被销毁时绑定仍然存在而导致的异常。
MainActivity代码
BIND_AUTO_CREATE Activity和Service绑定后自动创建Service
public class MainActivity extends AppCompatActivity {

    private ServiceConnection connection;
    private final static String TAG = "TAG";

    @Override
    protected void onCreate(Bundle savedInstanceState) {
        super.onCreate(savedInstanceState);
        setContentView(R.layout.activity_main);
    }

     /**
      * 绑定Service
      * @param view
     */
    public void bindServiceTest(View view) {
        Intent intent = new Intent(getApplicationContext(), ServiceLocal.class);
        if (connection == null) {
            connection = new ServiceConnection() {
                @Override
                public void onServiceConnected(ComponentName name, IBinder service) {
                    Log.e(TAG, "MainActivity ==> ServiceConnection$onServiceConnected()");
                }

                @Override
                public void onServiceDisconnected(ComponentName name) {

                }
            };
            // BIND_AUTO_CREATE Activity和Service绑定后自动创建Service
            bindService(intent, connection, BIND_AUTO_CREATE);
            Toast.makeText(this, "绑定Service", Toast.LENGTH_SHORT).show();
        } else {
            Toast.makeText(this, "已经绑定啦~", Toast.LENGTH_SHORT).show();
        }
    }

     /**
      * 解除绑定Service
      * @param view
      */
    public void unbindServiceTest(View view) {
        if (connection != null) {
            unbindService(connection);
            connection = null;
            Toast.makeText(this, "解除绑定啦!", Toast.LENGTH_SHORT).show();
        } else {
            // 还未绑定
            Toast.makeText(this, "还未绑定呢...", Toast.LENGTH_SHORT).show();
        }
    }

    @Override
    protected void onDestroy() {
        super.onDestroy();
        if (connection != null) {
            unbindService(connection);
            connection = null;
            Toast.makeText(this, "解除绑定啦!", Toast.LENGTH_SHORT).show();
        } else {
            // 还未绑定
            Toast.makeText(this, "还未绑定呢...", Toast.LENGTH_SHORT).show();
        }
    }
}
2
3
4
5
6
7
8
9
10
11
12
13
14
15
16
17
18
19
20
21
22
23
24
25
26
27
28
29
30
31
32
33
34
35
36
37
38
39
40
41
42
43
44
45
46
47
48
49
50
51
52
53
54
55
56
57
58
59
60
61
62
63
64
65
查看日志
top.iqqcode.testservice E/TAG: ServiceLocal ==> 执行构造,服务被创建啦~
top.iqqcode.testservice E/TAG: ServiceLocal ==> onCreate
top.iqqcode.testservice E/TAG: ServiceLocal ==> onBind
top.iqqcode.testservice E/TAG: MainActivity ==> ServiceConnection$onServiceConnected()
top.iqqcode.testservice E/TAG: ServiceLocal ==> onDestroy
2
3
4
5
# 取消绑定Service
当与Service绑定的组件被销毁时,应该及时取消与Service的绑定,否则会导致异常。
在组件中,调用unbindService(ServiceConnection conn)方法则可以取消与Service的绑定。
此外,还需要在onDestroy中也要解除绑定
# 2.3 Messenger绑定服务
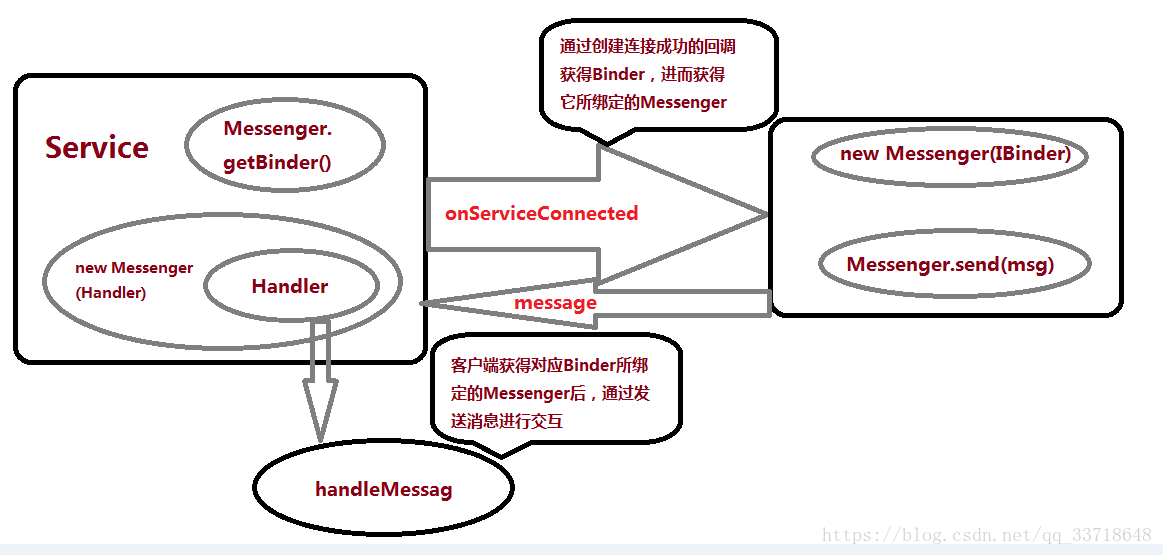
通过绑定服务的方式应用Messenger可以实现不同进程间的服务与客户端通信,此方式的实现过程如下:
- 首先,在Service中新建一个Handler处理客户端传过来的消息,进行对应的消息处理;
- 将Handler的对象传入新创建的Messenger对象中,建立Messenger与handler之间的联系;
- 通过Messenger.getBinder()获得IBInder对象,并通过Service的onBinder()方法将IBinder的对象传递给客户端(这里建立了Messenger和IBinder对象之间的联系或者说是绑定关系);
- 在客户端声明一个 ServiceConnection对象,在ServiceConnection对象的 onServiceConnected(),这个回调方法传到客户端一个IBinder对象,通过这个对象我们就和一获得与其联系的Messenger;
- 最后我们可以把要传递的数据和指令保存在Message对象中,调用Messenger.send(msg)方法将消息发送出去,因为我们的服务的Handler和这里的额Messenger是相互关联的,因此,服务中的Handler可以收到并处理这些消息。
- 此外,客户端也可以声明一个Handler对象用来处理服务传过来的消息
# 3. 停止Service
[方式一] Service中调用stopSelf()方法可以停止自身
[方式二] 通过Context的stopService(Intent intent)方法可停止Service,并销毁该Service组件
# 4. Service生命周期

Service的生命周期分为 start Service(启动模式) 和 bind Service(绑定模式) 两种
每调用一次startService()方法,onStartCommand()方法就会被执行,但是只会存在一个Service实例,只需调用一次stopService()或stopSelf()即可停止
There can be two forms of a service.The lifecycle of service can follow two different paths: started or bound.
- Started
- Bound
1) Started Service
当组件(如活动)调用startService()方法时,将启动服务,现在该服务将无限期在后台运行。 它由stopService()方法停止。 该服务可以通过调用stopSelf()方法来停止自身。
2) Bound Service
当另一个组件(例如客户端)调用bindService()方法时,将绑定服务。 客户端可以通过调用unbindService()方法来取消绑定服务。在所有客户端解除绑定服务之前,无法停止该服务。
对一个Service既调用startService又调用bindService方法,Service如何销毁?
根据Android系统机制,一个Service被启动或者被绑定之后,就处于运行状态,必须要两个条件同时不满足Service才能被销毁;所以要同时调用stopService()和unbindService()方法、onDestroy()方法才会被执行
# 4.1 启动模式生命周期
使用startService()方式激活的Service组件默认是是粘性的

【第一次调用】 构造方法 => onCreat() => onStartCommand()
【后面再调用】 onStartCommand()
点击销毁:onDestroy
top.iqqcode.servicelifecycle E/TAG:  ==> onCreate
top.iqqcode.servicelifecycle E/TAG:  ===> onStartCommand
top.iqqcode.servicelifecycle E/TAG:  ===> onDestroy
2
3
销毁之后再 多次点击创建
top.iqqcode.servicelifecycle E/TAG:  ==> onCreate
top.iqqcode.servicelifecycle E/TAG:  ===> onStartCommand
top.iqqcode.servicelifecycle E/TAG:  ===> onStartCommand
top.iqqcode.servicelifecycle E/TAG:  ===> onStartCommand
top.iqqcode.servicelifecycle E/TAG:  ===> onStartCommand
top.iqqcode.servicelifecycle E/TAG:  ===> onStartCommand
top.iqqcode.servicelifecycle E/TAG:  ===> onStartCommand
2
3
4
5
6
7
# 4.2 绑定模式生命周期
【绑定】 构造方法 => onCreate() => onBind() => onServiceConnected()
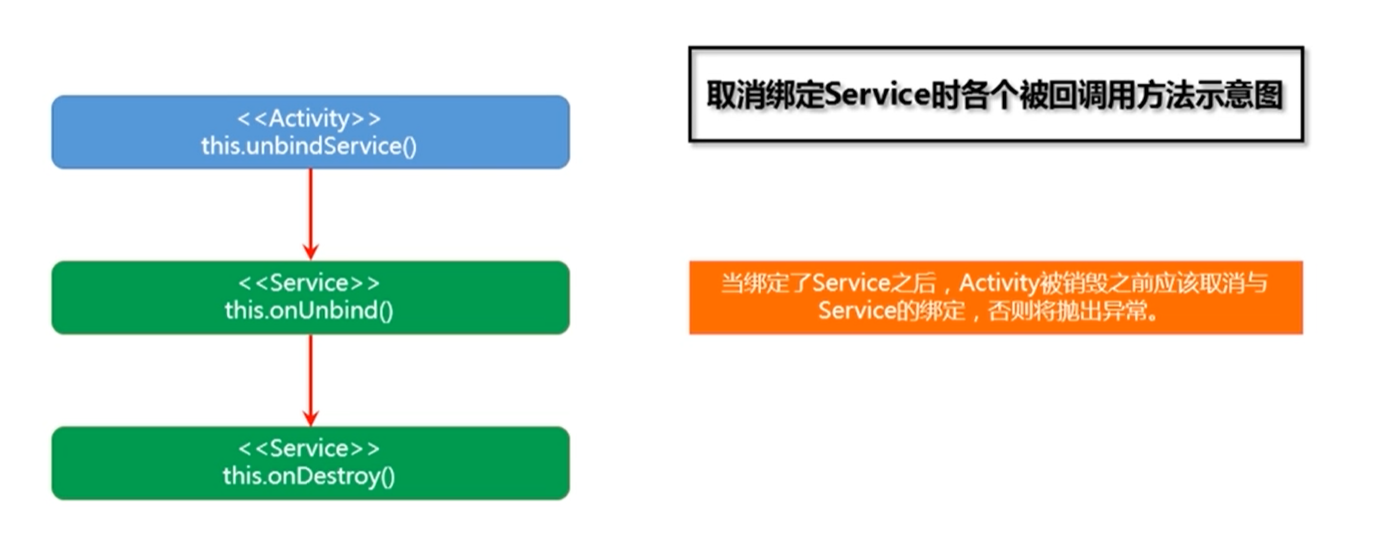
【解除绑定】 unbindService() => onUnBind() => onDestroy()
使用bindService()方式激活的Service组件 不是粘性的
【绑定Sevice的回调过程】
【取消绑定Sevice的回调过程】
当绑定了Service之后,Activity被销毁之前应该取消与Service的绑定,否则将抛出异常。
注意:
以绑定模式激活的Service组件并不是粘性的,且与Service绑定的组件在退出之前必须取消绑定,即无法保证Service组件依然存在,所以,为了保证其它组件可以销毁,但Service依然存在,可以:
- 先调用startService()激活Service组件;
- 再调用bindService()实现绑定。
# 5. Service的粘性
Service的粘性表现为:其所在进程被意外中止后,该Service是否可以自动重新被启动。
默认情况下,使用startService()方式激活的Service组件默认是是粘性的,即使其所在进程被**意外中止(不会调用onDestroy方法)**了,稍后该Service依然会被自动创建出来。
# 设置Service的粘性
在Service生命周期中onStartCommand()方法的返回值决定了Service的粘性。
该方法的返回值可以被设置为:
START_STICKY: 粘性的,被意外中止后自动重启,但丢失原来用于激活它的Intent;START_NOT_STICKY: 非粘性的,被意外中止后不会自动重启;START_REDELIVER_INTENT: 粘性的且重新发送Intent,即被意外中止后自动重启,且该Service组件将得到原来用于激活它的Intent对象;START_STICKY_COMPATIBILITY: START_STICKY的兼容版本,并不担保onStartCommand()会被重新调用。
# 参考文章
[1] 一禅小和尚LXY.Android中Service的三种使用方式[EB/OL].https://blog.csdn.net/qq_33718648/article/details/79880105?utm_source=blogxgwz9
[2] zejian.关于Android Service真正的完全详解,你需要知道的一切[EB/OL].http://blog.csdn.net/javazejian/article/details/52709857