 Fragment概述
# 1.Fragment设计思想
什么是Fragment
Fragment是Android3.0新增,意为“碎片”,它能让程序更加合理和充分地利用大屏幕的空间。用来组建Activity界面的局部模块,也可以说Activity界面由多个Fragment组成;其行为与Activity很相似,有自己对应的View,有自己的生命周期,接受自己的输入事件。
一个Fragment总是嵌套在Activity中使用,Fragment有自己的生命周期,但是他受到Activity的影响
Fragment本质上会产生一个FragmentLayout,它加载的布局为其子布局,再嵌套到Activity的布局中
为什么需要Fragment
Fragment的特点
- 模块化
- 可重用
- 可适配
# 1.1 Fragment VS Activity
- Fragment是Android3.0 之后出现的
- 一个Activity可以运行多个Fragment
- Fragment不能脱离Activity而存在
- Activity是屏幕的主题,Fragment是Activity的一个组成元素
Fragment和Activity是多对多的关系
- 一个Fragment可以存在于多个Activity中,被多个Activity包含
- 一个Activity可以有多个Fragment
Fragment通过getActivity()可以获取所在的Activity;
Activity通过FragmentManager的findFragmentById() 或 findFragmentByTag()获取Fragment
# 1.2 Fragment的创建
# 2. 导Fragment包的问题
这里可能会有三个不同包下的Fragment供你选择
- androidx.fragment.app.FragmentActivity 默认导入
- 一个是系统内置的android.app.Fragment 标志为废弃
- 一个是support-v4库中的android.support.v4.app.Fragment 建议使用
建议使用support-v4库中的Fragment,因为它可以让碎片在所有Android系统版本中保持功能一致性。比如说在Fragment中嵌套使用Fragment,这个功能是在Android 4.2系统中才开始支持的,如果你使用的是系统内置的Fragment,那么很遗憾,4.2系统之前的设备运行你的程序就会崩溃。而使用support-v4库中的Fragment就不会出现这个问题。另外,我们并不需要在build.gradle文件中添加support-v4库的依赖,因为build.gradle文件中已经添加了appcompat-v7库的依赖,而这个库会将support-v4库也一起引入进来。
在导入V4包却无法使用android.support.v4.app.Fragment出现报红现象:
【原因】:
Android Studio较新版本默认使用androidx的包,摒弃了以前的support包。使用的时候会自动导入androidx的包import androidx.fragment.app.Fragment;
【解决】
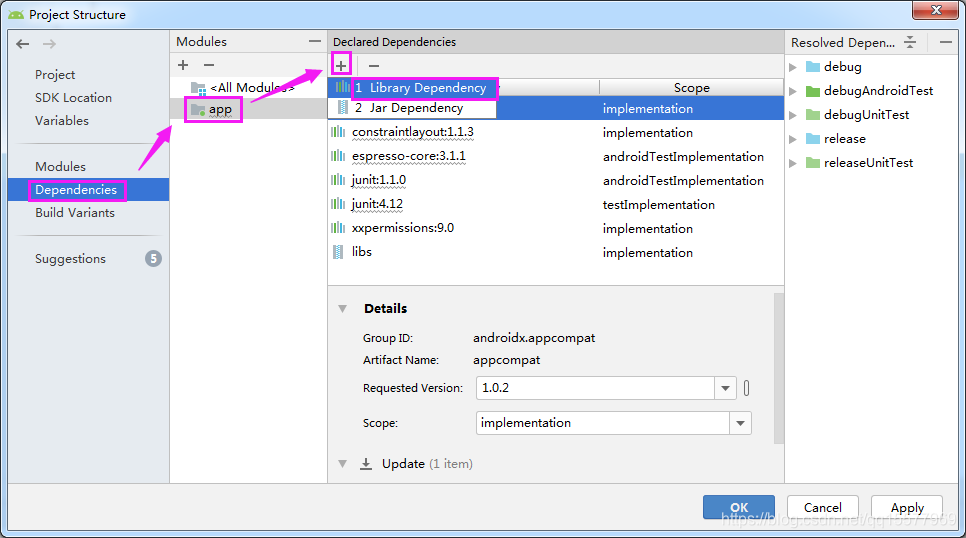
方法一:Project Structure导入
1、打开Android Studio → 项目右键 → projectStructure → 点选左侧栏的Dependencies → 在Modules栏目里选择你的项目,比如我的是app → 点击右上角**+** → 点选Library dependency
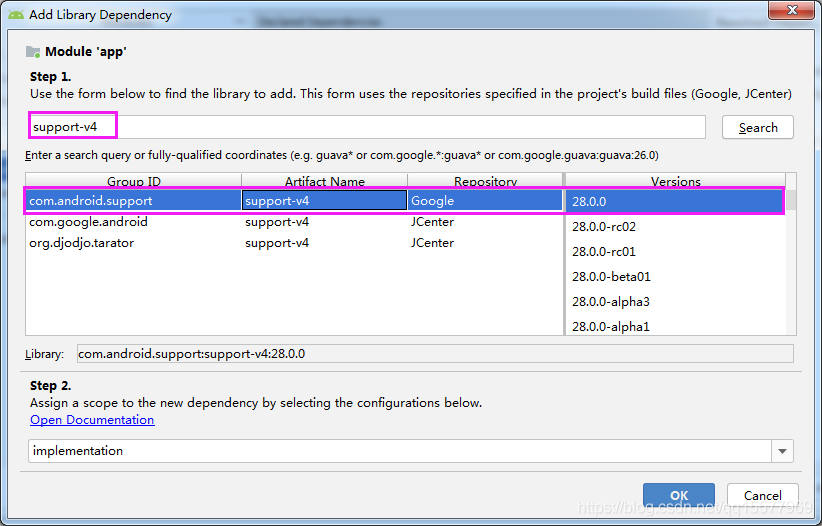
2、 在搜索框里输入“support-v4” → 选择你需要的support包版本 → 然后一直点“ok”即可
方法二:直接在工程目录下 Gradle Scripts-> build .gradle 下添加
dependencies {
    compile 'com.android.support:support-v4:22.2.0'
}
2
3
# 3. Fragment的加载
Fragment的加载方式:
- 静态加载XML
- 动态加载Java Code
# 3.1 静态加载
『第一步』:定义Fragment的子类,并在onCreateView中加载布局文件
代码定义布局(Fragment01)
public class FragmentView01 extends Fragment {

    @Nullable
    @Override
    public View onCreateView(@NonNull LayoutInflater inflater, @Nullable ViewGroup container, @Nullable Bundle savedInstanceState) {
        // 加载视图View对象并返回

        // 创建视图对象,设置数据并返回
        TextView mTextView = new TextView(getActivity());
        mTextView.setText("Fragment1");
        mTextView.setTextColor(Color.WHITE);
        mTextView.setTextSize(25);
        mTextView.setGravity(Gravity.CENTER);
        mTextView.setTypeface(Typeface.SERIF,Typeface.BOLD);
        mTextView.setBackgroundColor(Color.parseColor("#70a1ff"));
        return mTextView;
    }
}
2
3
4
5
6
7
8
9
10
11
12
13
14
15
16
17
18
XML + Java代码申明
XML定义布局-Fragement03
<?xml version="1.0" encoding="utf-8"?>
<RelativeLayout xmlns:android="http://schemas.android.com/apk/res/android"
    android:layout_width="match_parent"
    android:layout_height="match_parent"
    android:background="#ff6b81">

    <TextView
        android:id="@+id/tv_context_03"
        android:layout_width="wrap_content"
        android:layout_height="wrap_content"
        android:layout_centerInParent="true"
        android:text="TextView"
        android:textColor="#FFFFFF"
        android:textSize="25sp"
        android:textStyle="bold" />

</RelativeLayout>
2
3
4
5
6
7
8
9
10
11
12
13
14
15
16
17
代码申明-Fragement03,实现onCreateView
public class FragmentView03 extends Fragment {

    @Nullable
    @Override
    public View onCreateView(@NonNull LayoutInflater inflater, @Nullable ViewGroup container, @Nullable Bundle savedInstanceState) {
        // 加载视图View对象并返回
        View view = inflater.inflate(R.layout.fragment_view03,container, false);
        // 创建视图对象,设置数据并返回
        TextView mTextView = view.findViewById(R.id.tv_context_03);
        mTextView.setText("Fragment3");
        return view;
    }
}
2
3
4
5
6
7
8
9
10
11
12
13
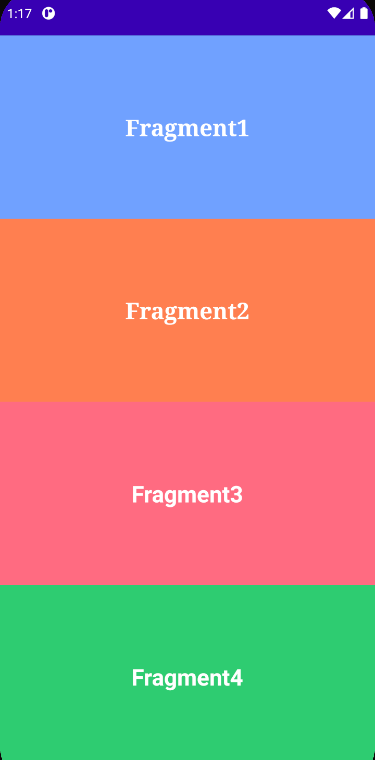
『第二步』:在 activity_main 布局文件中通过<fragment> 指定自定义Fragment,加上name属性
<?xml version="1.0" encoding="utf-8"?>
<LinearLayout xmlns:android="http://schemas.android.com/apk/res/android"
    xmlns:app="http://schemas.android.com/apk/res-auto"
    xmlns:tools="http://schemas.android.com/tools"
    android:layout_width="match_parent"
    android:layout_height="match_parent"
    android:orientation="vertical"
    tools:context=".MainActivity">

    <fragment
        android:id="@+id/fm_fragment_view01"
        android:name="top.iqqcode.basiclearn01.FragmentView01"
        android:layout_width="match_parent"
        android:layout_height="match_parent"
        android:layout_weight="1" />

    <fragment
        android:id="@+id/fm_fragment_view03"
        android:name="top.iqqcode.basiclearn01.FragmentView03"
        android:layout_width="match_parent"
        android:layout_height="match_parent"
        android:layout_weight="1" />

</LinearLayout>
2
3
4
5
6
7
8
9
10
11
12
13
14
15
16
17
18
19
20
21
22
23
24
『第三步』:AppCompatActivity继承Fragment, Activity继承FragmentActivity
public class MainActivity extends FragmentActivity {

    @Override
    protected void onCreate(Bundle savedInstanceState) {
        super.onCreate(savedInstanceState);
        setContentView(R.layout.activity_main);
    }
}
2
3
4
5
6
7
8
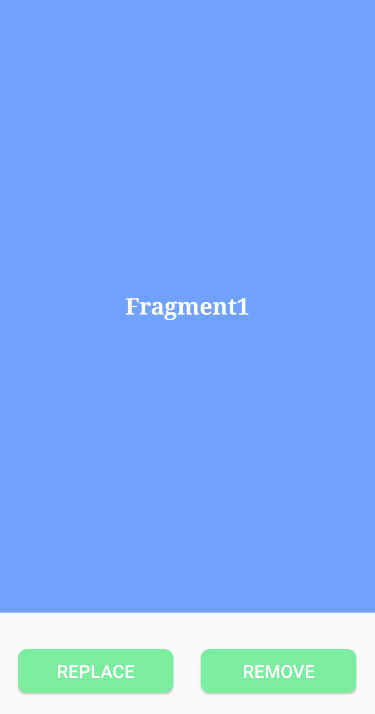
# 3.2 动态加载
『第一步』:创建待添加的碎片实例(代码创建 或者 XML + Java代码申明)
<?xml version="1.0" encoding="utf-8"?>
<LinearLayout xmlns:android="http://schemas.android.com/apk/res/android"
    xmlns:app="http://schemas.android.com/apk/res-auto"
    xmlns:tools="http://schemas.android.com/tools"
    android:layout_width="match_parent"
    android:layout_height="match_parent"
    android:orientation="vertical"
    tools:context=".MainActivity">

    <FrameLayout
        android:id="@+id/fl_container_view"
        android:layout_width="match_parent"
        android:layout_height="0dp"
        android:layout_weight="1"
        android:background="@drawable/fragment_background" />

    <RelativeLayout
        android:layout_width="match_parent"
        android:layout_height="wrap_content"
        android:layout_marginTop="20dp"
        android:layout_marginBottom="20dp"
        android:padding="20dp">

        <Button
            android:id="@+id/btn_replace"
            android:layout_width="match_parent"
            android:layout_height="wrap_content"
            android:layout_toLeftOf="@+id/center_view"
            android:background="@drawable/btn_background"
            android:text="replace"
            android:textColor="@color/white"
            android:textSize="20dp" />

        <View
            android:id="@+id/center_view"
            android:layout_width="30dp"
            android:layout_height="50dp"
            android:layout_centerInParent="true" />

        <Button
            android:id="@+id/btn_remove"
            android:layout_width="match_parent"
            android:layout_height="wrap_content"
            android:layout_toRightOf="@+id/center_view"
            android:background="@drawable/btn_background"
            android:text="Remove"
            android:textColor="@color/white"
            android:textSize="20dp" />

    </RelativeLayout>
</LinearLayout>
2
3
4
5
6
7
8
9
10
11
12
13
14
15
16
17
18
19
20
21
22
23
24
25
26
27
28
29
30
31
32
33
34
35
36
37
38
39
40
41
42
43
44
45
46
47
48
49
50
51
『第二步』:获取FragmentManager,在活动中可以直接通过调用getSupportFragmentManager() 方法得到
『第三步』:开启一个事务,通过调用beginTransaction() 方法开启
// Java动态添加Fragement到Activity中,涉及到FragmentManager 和 FragmentTransaction两个对象
FragmentManager fragmentManager = getFragmentManager();
FragmentTransaction fragmentTransaction = fragmentManager.beginTransaction();
fragmentTransaction.add(R.id.fm_fragment_view01, new FragmentView01());
2
3
4
『第四步』:向容器内添加或替换碎片,一般使用replace() 方法实现,需要传入容器的id和待添加的碎片实例
『第五步』:提交事务,调用commit() 方法来完成;commitAllowingStateLoss()为强制提交
public class MainActivity extends Activity implements View.OnClickListener {

    private Button mButton_replace, mButton_remove;
    FragmentView01 fl1 = null;

    @Override
    protected void onCreate(Bundle savedInstanceState) {
        super.onCreate(savedInstanceState);
        setContentView(R.layout.activity_main);

        mButton_replace = findViewById(R.id.btn_replace);
        mButton_remove = findViewById(R.id.btn_remove);
        mButton_replace.setOnClickListener(this);
        mButton_remove.setOnClickListener(this);

        fl1 = new FragmentView01();
        getFragmentManager().beginTransaction().add(R.id.fl_container_view, fl1).commit();
    }

    @Override
    public void onClick(View v) {
        FragmentManager manager = getFragmentManager();
        FragmentTransaction transaction = manager.beginTransaction();
        if (mButton_replace == v) {
            transaction.replace(R.id.fl_container_view, new FragmentView02())
                    // Fragment被替换后,可以点击返回键,返回替换前的状态
                    .addToBackStack(null)
                    .commitAllowingStateLoss();
        } else if (mButton_remove == v) {
            transaction.remove(fl1).commitAllowingStateLoss();
        }
    }
}
2
3
4
5
6
7
8
9
10
11
12
13
14
15
16
17
18
19
20
21
22
23
24
25
26
27
28
29
30
31
32
33
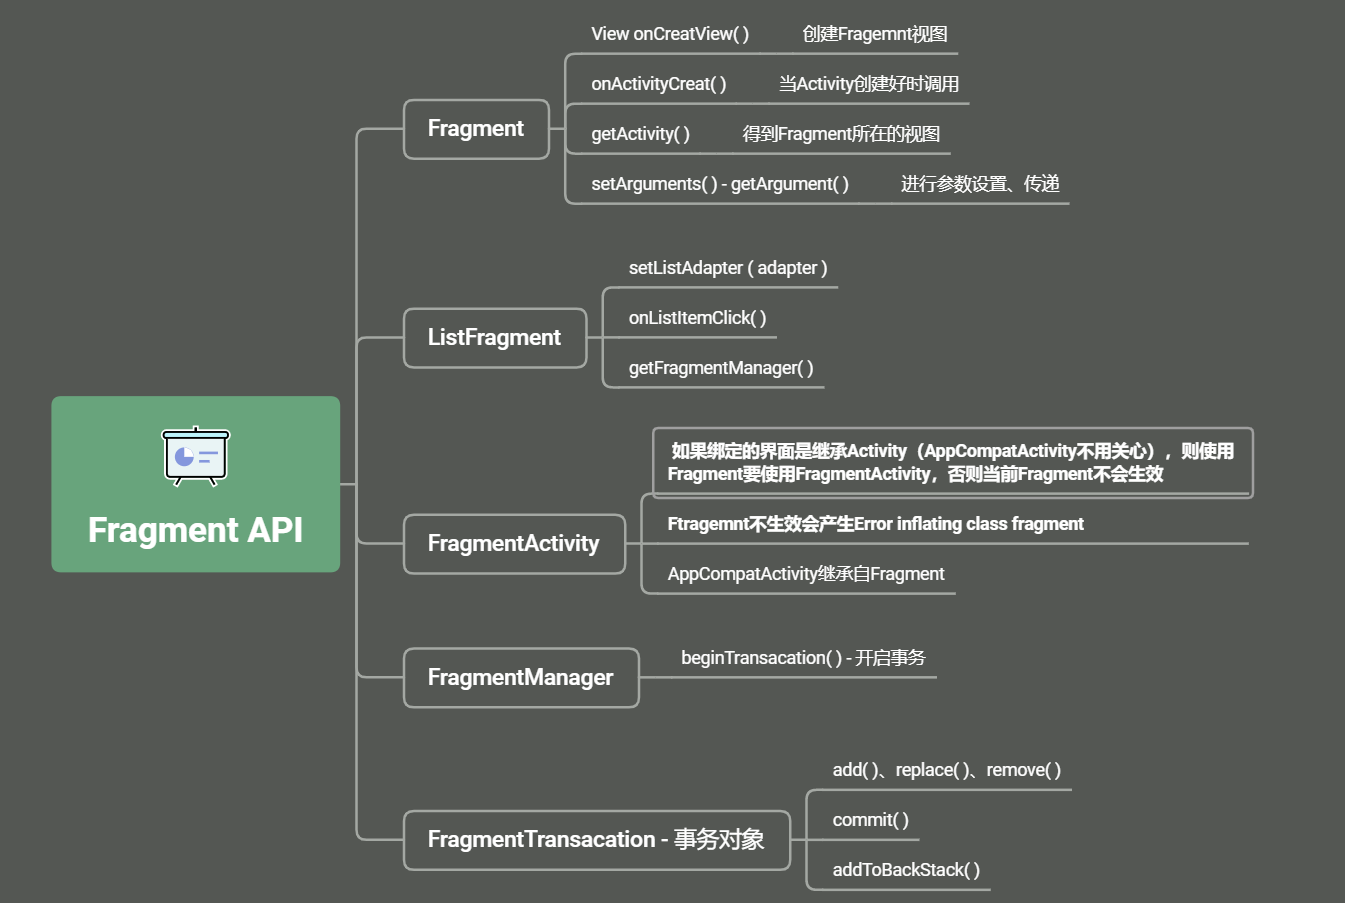
# 4. 相关API
# 5. Fragment的几个子类
- 对话框:DialogFragment
- 列表:ListFragment
- 选项设置:PreferenceFragment
- WebView界面:WebViewFragment