 原生HTTP使用(上)
文章转载自【菜鸟教程】https://www.runoob.com/w3cnote/android-tutorial-httpurlconnection.html (opens new window)
# 1. HttpURLConnection简介
答:一种多用途、轻量极的HTTP客户端,使用它来进行HTTP操作可以适用于大多数的应用程序。 虽然HttpURLConnection的API提供的比较简单,但是同时这也使得我们可以更加容易地去使 用和扩展它。继承至URLConnection,抽象类,无法直接实例化对象。通过调用openCollection() 方法获得对象实例,默认是带gzip压缩的;
# 2. HttpURLConnection的使用步骤
使用HttpURLConnection的步骤如下:
(1) 创建一个URL对象: URL url = new URL(https://www.baidu.com);
(2) 调用URL对象的openConnection( )来获取HttpURLConnection对象实例: HttpURLConnection conn = (HttpURLConnection) url.openConnection();
(3) 设置HTTP请求使用的方法:GET或者POST,或者其他请求方式比如:PUT conn.setRequestMethod("GET");
(4) 设置连接超时,读取超时的毫秒数,以及服务器希望得到的一些消息头 conn.setConnectTimeout(6*1000); conn.setReadTimeout(6 * 1000);
(5) 调用getInputStream()方法获得服务器返回的输入流,然后输入流进行读取了 InputStream in = conn.getInputStream();
(6) 最后调用disconnect()方法将HTTP连接关掉 conn.disconnect();
除了上面这些外,有时我们还可能需要对响应码进行判断,比如200:
if(conn.getResponseCode() != 200)
setConnectTimeout():指的是与请求网址的服务器建立连接的超时时间。setReadTimeout():指的是建立连接后如果指定时间内服务器没有返回数据的后超时
# 3.HttpURLConnection使用示例
这里我们主要针对GET和POST请求写两个不同的使用示例,我们可以conn.getInputStream() 获取到输入流,需要写一个类将流转化为二进制数组!工具类如下:
StreamTool.java:
public class StreamTool {
    //从流中读取数据
    public static byte[] read(InputStream inStream) throws Exception{
        ByteArrayOutputStream outStream = new ByteArrayOutputStream();
        byte[] buffer = new byte[1024];
        int len = 0;
        while((len = inStream.read(buffer)) != -1)
        {
            outStream.write(buffer,0,len);
        }
        inStream.close();
        return outStream.toByteArray();
    }
}
2
3
4
5
6
7
8
9
10
11
12
13
14
# 3.1 HttpURLConnection发送GET请求代码示例
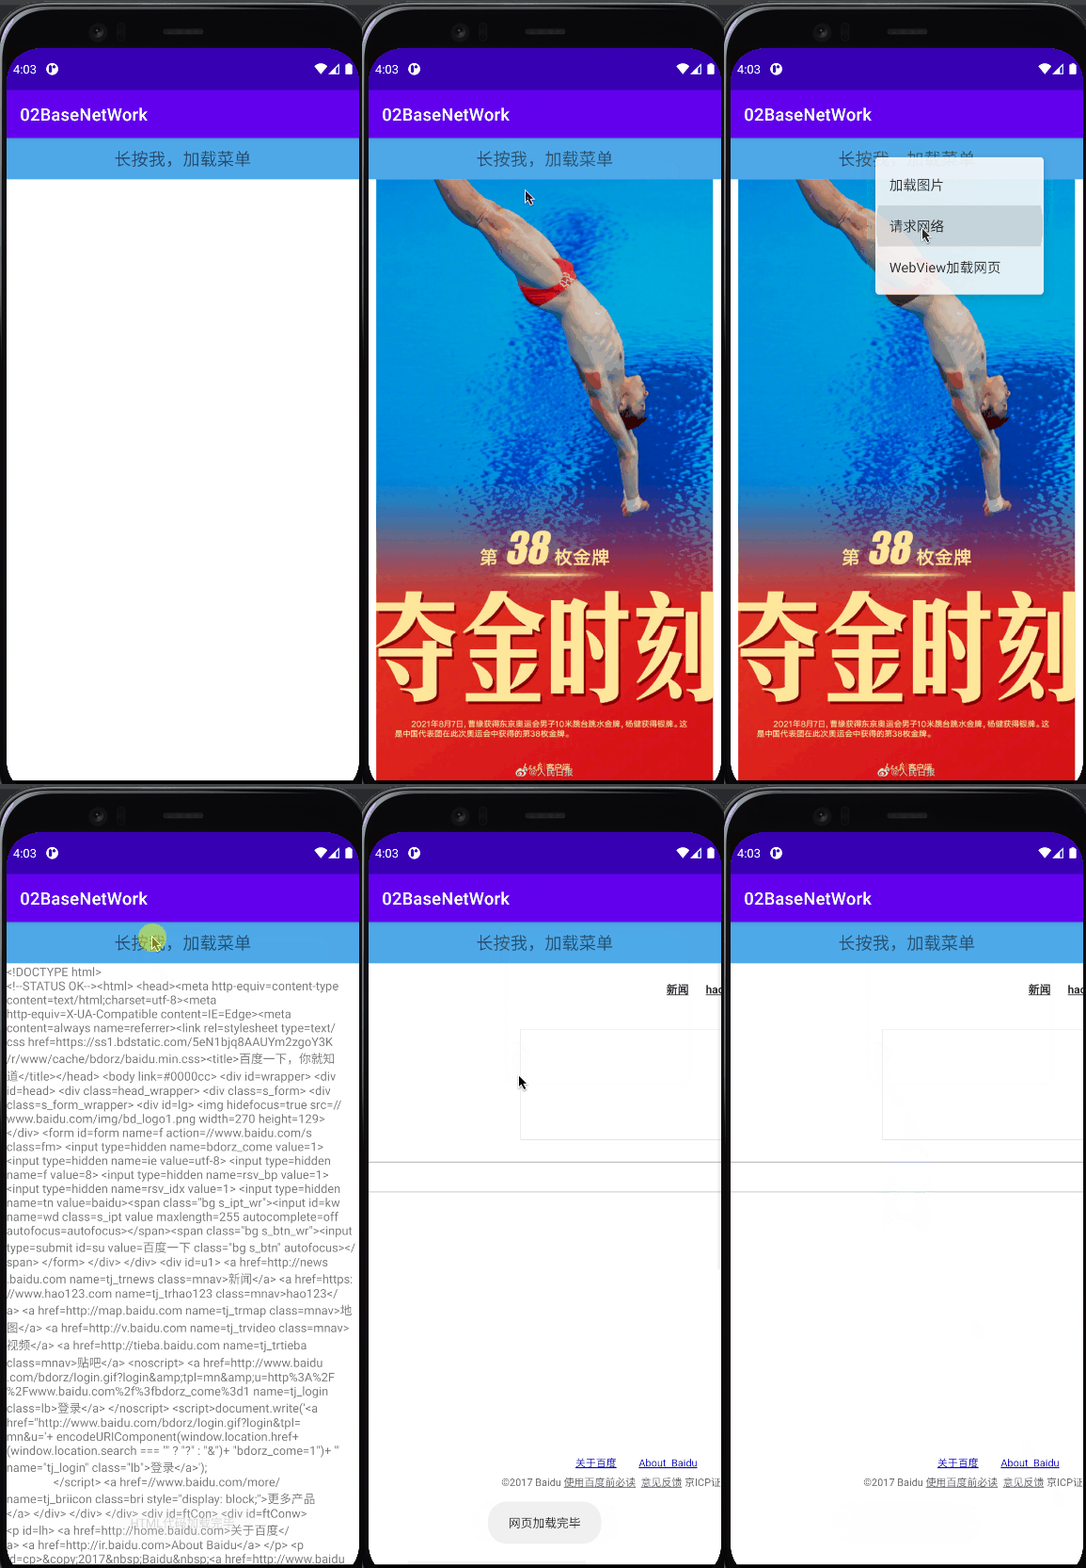
运行效果图:

核心部分代码:
布局:activity_main.xml
<LinearLayout xmlns:android="http://schemas.android.com/apk/res/android"
    android:layout_width="match_parent"
    android:layout_height="match_parent"
    android:orientation="vertical">

    <TextView
        android:id="@+id/txtMenu"
        android:layout_width="match_parent"
        android:layout_height="48dp"
        android:background="#4EA9E9"
        android:clickable="true"
        android:gravity="center"
        android:text="长按我,加载菜单"
        android:textSize="20sp" />

    <ImageView
        android:id="@+id/imgPic"
        android:layout_width="match_parent"
        android:layout_height="match_parent"
        android:visibility="gone" />

    <ScrollView
        android:id="@+id/scroll"
        android:layout_width="match_parent"
        android:layout_height="match_parent"
        android:visibility="gone">

        <TextView
            android:id="@+id/txtshow"
            android:layout_width="wrap_content"
            android:layout_height="wrap_content" />
    </ScrollView>

    <WebView
        android:id="@+id/webView"
        android:layout_width="match_parent"
        android:layout_height="match_parent" />

</LinearLayout>
2
3
4
5
6
7
8
9
10
11
12
13
14
15
16
17
18
19
20
21
22
23
24
25
26
27
28
29
30
31
32
33
34
35
36
37
38
39
获取数据类:GetData.java:
public class GetData {
    // 定义一个获取网络图片数据的方法:
    public static byte[] getImage(String path) throws Exception {
        URL url = new URL(path);
        HttpURLConnection conn = (HttpURLConnection) url.openConnection();
        // 设置连接超时为5秒
        conn.setConnectTimeout(5000);
        // 设置请求类型为Get类型
        conn.setRequestMethod("GET");
        // 判断请求Url是否成功
        if (conn.getResponseCode() != 200) {
            throw new RuntimeException("请求url失败");
        }
        InputStream inStream = conn.getInputStream();
        byte[] bt = StreamTool.read(inStream);
        inStream.close();
        return bt;
    }

    // 获取网页的html源代码
    public static String getHtml(String path) throws Exception {
        URL url = new URL(path);
        HttpURLConnection conn = (HttpURLConnection) url.openConnection();
        conn.setConnectTimeout(5000);
        conn.setRequestMethod("GET");
        if (conn.getResponseCode() == 200) {
            InputStream in = conn.getInputStream();
            byte[] data = StreamTool.read(in);
            String html = new String(data, "UTF-8");
            return html;
        }
        return null;
    }
}
2
3
4
5
6
7
8
9
10
11
12
13
14
15
16
17
18
19
20
21
22
23
24
25
26
27
28
29
30
31
32
33
34
MainActivity.java
🔗MainActivity.java (opens new window)
最后别忘了加上联网权限:
<uses-permission android:name="android.permission.INTERNET" />
# 3.2 HttpURLConnection发送POST请求代码示例
有GET自然有POST,我们通过openConnection获取到的HttpURLConnection默认是进行Get请求的, 所以我们使用POST提交数据,应提前设置好相关的参数:
conn.setRequestMethod("POST");
conn.setDoOutput(true);
conn.setDoInput(true); // 设置允许输入
conn.setUseCaches(false); // POST方法不能缓存,要手动设置为false
2
3
4
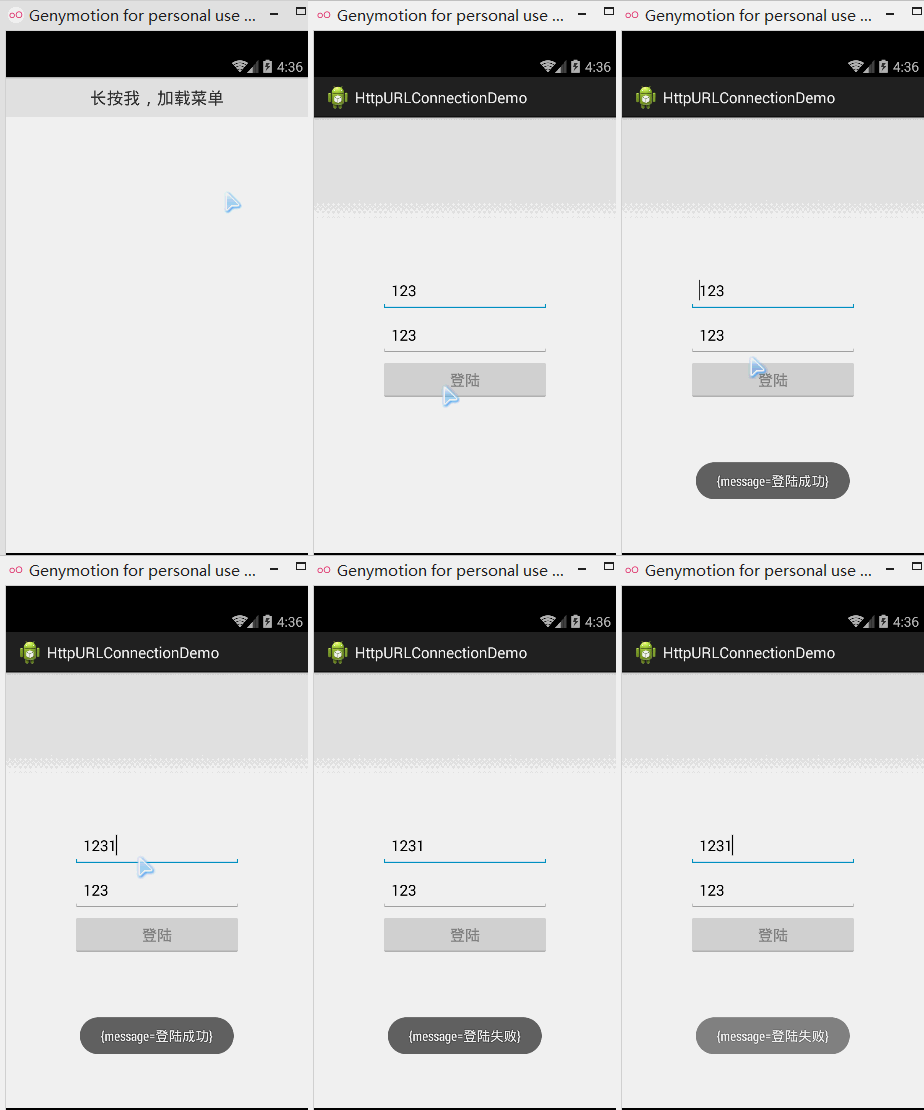
运行效果图:

核心代码:
PostUtils.java
public class PostUtils {
    public static String LOGIN_URL = "http://172.16.2.54:8080/HttpTest/ServletForPost";
    public static String LoginByPost(String number,String passwd)
    {
        String msg = "";
        try{
            HttpURLConnection conn = (HttpURLConnection) new URL(LOGIN_URL).openConnection();
            //设置请求方式,请求超时信息
            conn.setRequestMethod("POST");
            conn.setReadTimeout(5000);
            conn.setConnectTimeout(5000);
            //设置运行输入,输出:
            conn.setDoOutput(true);
            conn.setDoInput(true);
            //Post方式不能缓存,需手动设置为false
            conn.setUseCaches(false);
            //我们请求的数据:
            String data = "passwd="+ URLEncoder.encode(passwd, "UTF-8")+
                    "&number="+ URLEncoder.encode(number, "UTF-8");
            //这里可以写一些请求头的东东...
            //获取输出流
            OutputStream out = conn.getOutputStream();
            out.write(data.getBytes());
            out.flush();
             if (conn.getResponseCode() == 200) {
                    // 获取响应的输入流对象
                    InputStream is = conn.getInputStream();
                    // 创建字节输出流对象
                    ByteArrayOutputStream message = new ByteArrayOutputStream();
                    // 定义读取的长度
                    int len = 0;
                    // 定义缓冲区
                    byte buffer[] = new byte[1024];
                    // 按照缓冲区的大小,循环读取
                    while ((len = is.read(buffer)) != -1) {
                        // 根据读取的长度写入到os对象中
                        message.write(buffer, 0, len);
                    }
                    // 释放资源
                    is.close();
                    message.close();
                    // 返回字符串
                    msg = new String(message.toByteArray());
                    return msg;
             }
        }catch(Exception e){e.printStackTrace();}
        return msg;
    }
}
2
3
4
5
6
7
8
9
10
11
12
13
14
15
16
17
18
19
20
21
22
23
24
25
26
27
28
29
30
31
32
33
34
35
36
37
38
39
40
41
42
43
44
45
46
47
48
49
# 4.使用HttpURLConnection发送PUT请求
public static String LoginByPut(Context mContext, String mobile, String password, int from, String devid,String version_name, int remember_me) {
    String resp = "";
    try {
        HttpURLConnection conn = (HttpURLConnection) new URL(LOGIN_URL).openConnection();
        conn.setRequestMethod("PUT");
        conn.setReadTimeout(5000);
        conn.setConnectTimeout(5000);
        conn.setDoOutput(true);
        conn.setDoInput(true);
        conn.setUseCaches(false);

        String data = "mobile=" + mobile + "&password=" + password + "&from=" + from + "&devid=" + "devid"
                + "&version_name=" + "version_name" + "&remember_me=" + remember_me;
        ;
        // 获取输出流:
        OutputStreamWriter writer = new OutputStreamWriter(conn.getOutputStream());
        writer.write(data);
        writer.flush();
        writer.close();

        // 获取相应流对象:
        InputStream in = conn.getInputStream();
        BufferedReader reader = new BufferedReader(new InputStreamReader(in));
        StringBuilder response = new StringBuilder();
        String line;
        while ((line = reader.readLine()) != null)
            response.append(line);
        SPUtils.put(mContext, "session", conn.getHeaderField("Set-Cookie"));
        // 资源释放:
        in.close();
        // 返回字符串
        Log.e("HEHE", response.toString());
        return response.toString();
    } catch (Exception e) {
        e.printStackTrace();
    }
    return "";
}
2
3
4
5
6
7
8
9
10
11
12
13
14
15
16
17
18
19
20
21
22
23
24
25
26
27
28
29
30
31
32
33
34
35
36
37
38
