 什么时候该用约束布局ConstraintLayout
以下文章来源于微信公众号** Android群英传** ,作者徐宜生,《什么时候该用约束布局ConstraintLayout?》
# 前言
常见的约束布局ConstraintLayout的使用场景是什么呢?今天我将带来ConstraintLayout的最佳实践,主要包括九大场景:
场景1:固定比例视图
场景2:N等分布局
场景3:复杂的元素相对居中
场景4:百分比对齐
场景5:角度布局
场景6:整体居中
场景7:超长限制强制约束
场景8:多组件协同约束
场景9:容器约束下的边界约束
# 场景1:固定比例视图
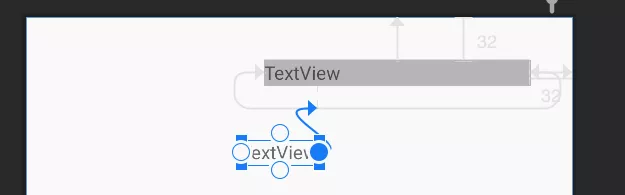
考虑下面这个场景,组件宽度撑满屏幕,高度按「宽度x固定比例」计算。
这样的布局,在以往的布局方式下,都需要通过动态计算后修改高度来实现,但是通过ConstraintLayout,则可以直接在XML中实现。
<ImageView
    android:layout_width="match_parent"
    android:layout_height="@dimen/length_0"
    app:layout_constraintDimensionRatio="1:0.34"
    app:layout_constraintStart_toStartOf="parent"
    app:layout_constraintTop_toTopOf="parent" />
2
3
4
5
6
通过DimensionRatio,可以很方便的实现比例视图的控制,同时,比例可以设置的很灵活,满足各种条件的需要。
# 场景2:N等分布局
常见的N等分布局,例如三等分布局,通常都需要进行动态计算,根据屏幕宽度,减去间距后得到每部分的宽度,再动态设置给每个元素,而通过ConstraintLayout,则可以直接实现这样的效果。
<?xml version="1.0" encoding="utf-8"?>
<androidx.constraintlayout.widget.ConstraintLayout xmlns:android="http://schemas.android.com/apk/res/android"
    xmlns:app="http://schemas.android.com/apk/res-auto"
    xmlns:tools="http://schemas.android.com/tools"
    android:layout_width="match_parent"
    android:layout_height="wrap_content"
    android:layout_marginLeft="@dimen/length_16"
    android:layout_marginRight="@dimen/length_16">

    <ImageView
        android:id="@+id/bookCover1"
        android:layout_width="0dp"
        android:layout_height="0dp"
        app:layout_constraintDimensionRatio="0.74:1"
        app:layout_constraintEnd_toStartOf="@+id/bookCover2"
        app:layout_constraintHorizontal_chainStyle="spread_inside"
        app:layout_constraintStart_toStartOf="parent"
        app:layout_constraintTop_toTopOf="parent"
        app:layout_constraintWidth_percent="0.30"
        tools:srcCompat="@tools:sample/avatars" />

    <ImageView
        android:id="@+id/bookCover2"
        android:layout_width="0dp"
        android:layout_height="0dp"
        android:visibility="invisible"
        app:layout_constraintDimensionRatio="0.74:1"
        app:layout_constraintEnd_toStartOf="@+id/bookCover3"
        app:layout_constraintStart_toEndOf="@+id/bookCover1"
        app:layout_constraintTop_toTopOf="@+id/bookCover1"
        app:layout_constraintWidth_percent="0.30"
        tools:srcCompat="@tools:sample/avatars" />

    <ImageView
        android:id="@+id/bookCover3"
        android:layout_width="0dp"
        android:layout_height="0dp"
        app:layout_constraintDimensionRatio="0.74:1"
        app:layout_constraintEnd_toEndOf="parent"
        app:layout_constraintStart_toEndOf="@+id/bookCover2"
        app:layout_constraintTop_toTopOf="@+id/bookCover2"
        app:layout_constraintWidth_percent="0.30"
        tools:srcCompat="@tools:sample/avatars" />

</androidx.constraintlayout.widget.ConstraintLayout>
2
3
4
5
6
7
8
9
10
11
12
13
14
15
16
17
18
19
20
21
22
23
24
25
26
27
28
29
30
31
32
33
34
35
36
37
38
39
40
41
42
43
44
45
效果如下图所示。
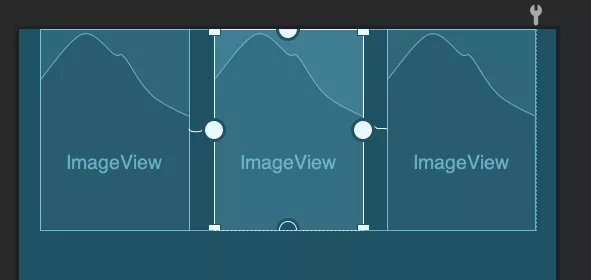
这其中的间距,主要是通过layout_constraintWidth_percent来设置在当前容器尺寸下所占百分比来进一步约束大小。
如果去掉这个属性,那么会直接等分父容器尺寸。
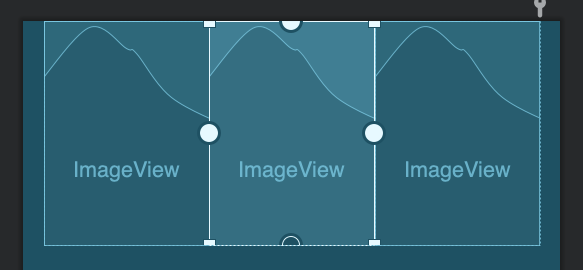
另外,还可以通过layout_constraintHorizontal_weight属性来控制类似LinearLayout的weight属性的效果,实现按权重进行分配。
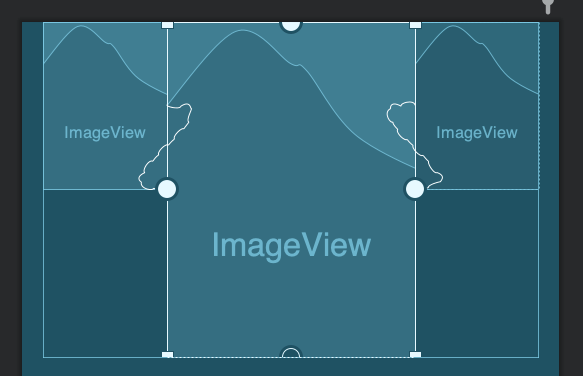
# 场景3:复杂的元素相对居中
在整个View中,针对某个固定元素,其它的元素围绕它做的各种对齐方式,在之前是很难直接完成的,即使是使用-margin的方式,也很难实现动态可变尺寸的居中,而在ConstraintLayout中,这就变得很简单了。
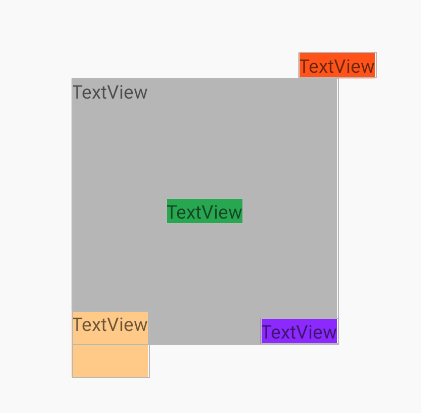
# 场景4:百分比对齐
在ConstraintLayout中,虽然不能使用-margin的方式来完成传统布局中的一些错位的效果,但是可以借助Space来实现类似的功能,例如借助Space来实现左边TextView在右边TextView某一百分比(或者是dp)对齐的场景。
代码如下所示。
<?xml version="1.0" encoding="utf-8"?>
<androidx.constraintlayout.widget.ConstraintLayout xmlns:android="http://schemas.android.com/apk/res/android"
    xmlns:app="http://schemas.android.com/apk/res-auto"
    xmlns:tools="http://schemas.android.com/tools"
    android:layout_width="match_parent"
    android:layout_height="match_parent">

    <TextView
        android:id="@+id/textView2"
        android:layout_width="200dp"
        android:layout_height="wrap_content"
        android:layout_marginTop="32dp"
        android:layout_marginEnd="32dp"
        android:background="#bebebe"
        android:text="TextView"
        app:layout_constraintEnd_toEndOf="parent"
        app:layout_constraintTop_toTopOf="parent" />

    <Space
        android:id="@+id/space"
        android:layout_width="wrap_content"
        android:layout_height="wrap_content"
        app:layout_constraintEnd_toEndOf="@+id/textView2"
        app:layout_constraintHorizontal_bias="0.2"
        app:layout_constraintStart_toStartOf="@+id/textView2"
        tools:layout_editor_absoluteY="68dp" />

    <TextView
        android:id="@+id/textView3"
        android:layout_width="wrap_content"
        android:layout_height="wrap_content"
        android:text="TextView"
        app:layout_constraintEnd_toStartOf="@+id/space"
        tools:layout_editor_absoluteY="92dp" />

</androidx.constraintlayout.widget.ConstraintLayout>
2
3
4
5
6
7
8
9
10
11
12
13
14
15
16
17
18
19
20
21
22
23
24
25
26
27
28
29
30
31
32
33
34
35
36
由于ConstraintLayout不支持-Margin,所以很多场景下,我们都可以借助Space等辅助元素来实现中转,完成传统布局下通过-Margin实现的效果。
# 场景5:角度布局
通过角度的方式来对元素进行排列,在传统布局中,只能通过FrameLayout,并通过动态计算的方式,将角度换算为边距的方式来布局,但通过ConstraintLayout,则变的非常简单。
<?xml version="1.0" encoding="utf-8"?>
<androidx.constraintlayout.widget.ConstraintLayout xmlns:android="http://schemas.android.com/apk/res/android"
    xmlns:app="http://schemas.android.com/apk/res-auto"
    android:layout_width="match_parent"
    android:layout_height="match_parent">

    <TextView
        android:id="@+id/textView1"
        android:layout_width="wrap_content"
        android:layout_height="wrap_content"
        android:text="Center"
        app:layout_constraintBottom_toBottomOf="parent"
        app:layout_constraintEnd_toEndOf="parent"
        app:layout_constraintStart_toStartOf="parent"
        app:layout_constraintTop_toTopOf="parent" />

    <TextView
        android:id="@+id/textView2"
        android:layout_width="wrap_content"
        android:layout_height="wrap_content"
        android:text="30"
        app:layout_constraintBottom_toTopOf="@+id/textView1"
        app:layout_constraintCircle="@id/textView1"
        app:layout_constraintCircleAngle="30"
        app:layout_constraintCircleRadius="100dp"
        app:layout_constraintStart_toEndOf="@+id/textView1" />

    <TextView
        android:id="@+id/textView3"
        android:layout_width="wrap_content"
        android:layout_height="wrap_content"
        android:text="60"
        app:layout_constraintBottom_toTopOf="@+id/textView1"
        app:layout_constraintCircle="@id/textView1"
        app:layout_constraintCircleAngle="60"
        app:layout_constraintCircleRadius="100dp"
        app:layout_constraintStart_toEndOf="@+id/textView1" />

    <TextView
        android:id="@+id/textView4"
        android:layout_width="wrap_content"
        android:layout_height="wrap_content"
        android:text="90"
        app:layout_constraintBottom_toTopOf="@+id/textView1"
        app:layout_constraintCircle="@id/textView1"
        app:layout_constraintCircleAngle="90"
        app:layout_constraintCircleRadius="100dp"
        app:layout_constraintStart_toEndOf="@+id/textView1" />

</androidx.constraintlayout.widget.ConstraintLayout>
2
3
4
5
6
7
8
9
10
11
12
13
14
15
16
17
18
19
20
21
22
23
24
25
26
27
28
29
30
31
32
33
34
35
36
37
38
39
40
41
42
43
44
45
46
47
48
49
50
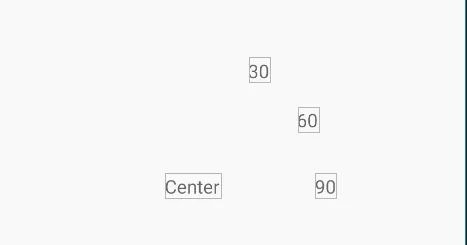
这种布局的方式,涉及的属性如下。
layout_constraintCircleAngle
layout_constraintCircleRadius
layout_constraintStart_toEndOf
2
3
通过这几个属性就可以很方便的按照角度坐标来进行布局。
# 场景6:整体居中
通过Chain可以实现多个元素在边缘约束的场景下居中的效果,如图所示。
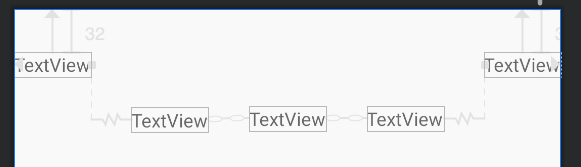
这也是ConstraintLayout基操,不细说了。
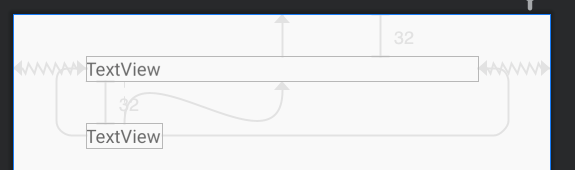
# 场景7:超长限制强制约束
考虑下面这个场景,最下面的TextView最大不会超过第一个TextView的宽度。
<?xml version="1.0" encoding="utf-8"?>
<androidx.constraintlayout.widget.ConstraintLayout xmlns:android="http://schemas.android.com/apk/res/android"
    xmlns:app="http://schemas.android.com/apk/res-auto"
    android:layout_width="match_parent"
    android:layout_height="match_parent">

    <TextView
        android:id="@+id/textView2"
        android:layout_width="300dp"
        android:layout_height="wrap_content"
        android:layout_marginTop="32dp"
        android:text="TextView"
        app:layout_constraintEnd_toEndOf="parent"
        app:layout_constraintStart_toStartOf="parent"
        app:layout_constraintTop_toTopOf="parent" />

    <TextView
        android:id="@+id/textView3"
        android:layout_width="wrap_content"
        android:layout_height="wrap_content"
        android:layout_marginTop="32dp"
        android:ellipsize="end"
        android:singleLine="true"
        android:text="TextViewTextViewTextViewTextViewTextViewTextViewTextViewTextViewTextViewTextView"
        app:layout_constrainedWidth="true"
        app:layout_constraintEnd_toEndOf="@+id/textView2"
        app:layout_constraintHorizontal_bias="0.0"
        app:layout_constraintStart_toStartOf="@+id/textView2"
        app:layout_constraintTop_toBottomOf="@+id/textView2" />

</androidx.constraintlayout.widget.ConstraintLayout>
2
3
4
5
6
7
8
9
10
11
12
13
14
15
16
17
18
19
20
21
22
23
24
25
26
27
28
29
30
31
效果如下所示。

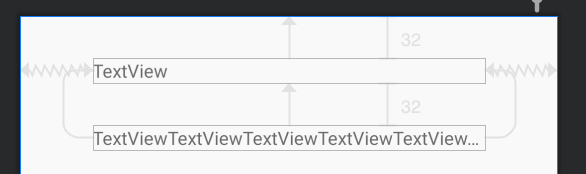
这时候就需要通过使用constrainedWidth来使其宽度约束强制生效。
类似的,再考虑下面这个场景。
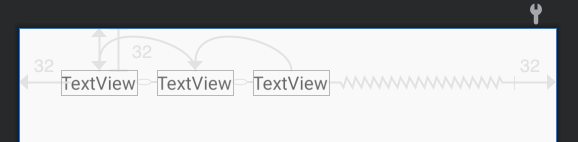
当第二个TextView文字超长的时候,希望它截断,而不会影响左右的TextView。这个场景非常常用,在很多业务场景下都会使用到这样的功能,传统布局下,只能在布局时动态计算文字宽度来进行动态修改,但通过ConstraintLayout,则可以非常方便的实现。
<?xml version="1.0" encoding="utf-8"?>
<androidx.constraintlayout.widget.ConstraintLayout xmlns:android="http://schemas.android.com/apk/res/android"
    xmlns:app="http://schemas.android.com/apk/res-auto"
    android:layout_width="match_parent"
    android:layout_height="match_parent">

    <TextView
        android:id="@+id/textView4"
        android:layout_width="wrap_content"
        android:layout_height="wrap_content"
        android:layout_marginStart="32dp"
        android:layout_marginTop="32dp"
        android:text="TextView"
        app:layout_constraintEnd_toStartOf="@+id/textView5"
        app:layout_constraintHorizontal_bias="0.0"
        app:layout_constraintHorizontal_chainStyle="packed"
        app:layout_constraintStart_toStartOf="parent"
        app:layout_constraintTop_toTopOf="parent" />

    <TextView
        android:id="@+id/textView5"
        android:layout_width="wrap_content"
        android:layout_height="wrap_content"
        android:layout_marginStart="16dp"
        android:layout_marginEnd="16dp"
        android:ellipsize="end"
        android:singleLine="true"
        android:text="TextViewTextViewTextViewTextViewTextViewTextViewTextView"
        app:layout_constrainedWidth="true"
        app:layout_constraintEnd_toStartOf="@+id/textView6"
        app:layout_constraintHorizontal_bias="0.5"
        app:layout_constraintStart_toEndOf="@+id/textView4"
        app:layout_constraintTop_toTopOf="@+id/textView4" />

    <TextView
        android:id="@+id/textView6"
        android:layout_width="wrap_content"
        android:layout_height="wrap_content"
        android:layout_marginEnd="32dp"
        android:text="TextView"
        app:layout_constraintEnd_toEndOf="parent"
        app:layout_constraintHorizontal_bias="0.5"
        app:layout_constraintStart_toEndOf="@+id/textView5"
        app:layout_constraintTop_toTopOf="@+id/textView5" />

</androidx.constraintlayout.widget.ConstraintLayout>
2
3
4
5
6
7
8
9
10
11
12
13
14
15
16
17
18
19
20
21
22
23
24
25
26
27
28
29
30
31
32
33
34
35
36
37
38
39
40
41
42
43
44
45
46
# 场景8:多组件协同约束
考虑下面这个场景,多个组件的宽度不定,需要取最大宽度的组件在布局中展示,例如下面这个例子。
Email和Password两个TextView的宽度可能因为文字的不一样而不同,需要他们整体取最大宽度后,与右边元素进行对齐,如下所示。
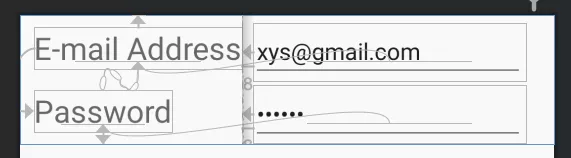
这时候,就需要使用Barrier。Barrier可以理解为一个栅栏,Barrier和Group一样,通过constraint_referenced_ids来组合需要作用的组件,代码如下。
<?xml version="1.0" encoding="utf-8"?>
<androidx.constraintlayout.widget.ConstraintLayout xmlns:android="http://schemas.android.com/apk/res/android"
    xmlns:app="http://schemas.android.com/apk/res-auto"
    xmlns:tools="http://schemas.android.com/tools"
    android:layout_width="match_parent"
    android:layout_height="wrap_content">

    <TextView
        android:id="@+id/email"
        android:layout_width="wrap_content"
        android:layout_height="wrap_content"
        android:layout_marginBottom="8dp"
        android:textSize="24sp"
        app:layout_constraintBottom_toTopOf="@+id/password"
        app:layout_constraintStart_toStartOf="@+id/password"
        app:layout_constraintTop_toTopOf="parent"
        app:layout_constraintVertical_chainStyle="packed"
        tools:text="E-mail Address" />

    <EditText
        android:id="@+id/emailInput"
        android:layout_width="wrap_content"
        android:layout_height="wrap_content"
        android:layout_marginStart="8dp"
        android:ems="10"
        android:inputType="textEmailAddress"
        android:text="xys@gmail.com"
        app:layout_constraintBaseline_toBaselineOf="@+id/email"
        app:layout_constraintStart_toEndOf="@+id/barrier" />

    <TextView
        android:id="@+id/password"
        android:layout_width="wrap_content"
        android:layout_height="wrap_content"
        android:layout_marginTop="8dp"
        android:text="Password"
        android:textSize="24sp"
        app:layout_constraintBottom_toBottomOf="parent"
        app:layout_constraintTop_toBottomOf="@+id/email"
        tools:layout_editor_absoluteX="11dp" />

    <EditText
        android:id="@+id/passwordInput"
        android:layout_width="wrap_content"
        android:layout_height="wrap_content"
        android:layout_marginStart="8dp"
        android:ems="10"
        android:inputType="textPassword"
        android:text="666666"
        app:layout_constraintBaseline_toBaselineOf="@+id/password"
        app:layout_constraintStart_toEndOf="@+id/barrier" />

    <androidx.constraintlayout.widget.Barrier
        android:id="@+id/barrier"
        android:layout_width="wrap_content"
        android:layout_height="wrap_content"
        app:barrierDirection="right"
        app:constraint_referenced_ids="email,password" />

</androidx.constraintlayout.widget.ConstraintLayout>
2
3
4
5
6
7
8
9
10
11
12
13
14
15
16
17
18
19
20
21
22
23
24
25
26
27
28
29
30
31
32
33
34
35
36
37
38
39
40
41
42
43
44
45
46
47
48
49
50
51
52
53
54
55
56
57
58
59
60
其中barrierDirection设置为right,即右侧不超过Barrier,再让剩余组件与Barrier进行约束即可。
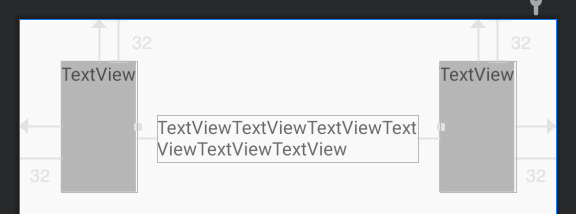
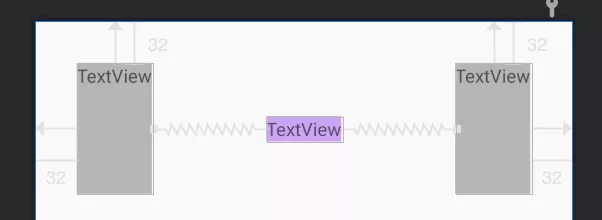
# 场景9:容器约束下的边界约束
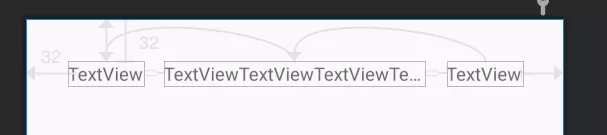
考虑下面这个场景,中间的TextView被约束在两边的组件中,如下所示。
<?xml version="1.0" encoding="utf-8"?>
<androidx.constraintlayout.widget.ConstraintLayout xmlns:android="http://schemas.android.com/apk/res/android"
    xmlns:app="http://schemas.android.com/apk/res-auto"
    xmlns:tools="http://schemas.android.com/tools"
    android:layout_width="match_parent"
    android:layout_height="match_parent">

    <TextView
        android:id="@+id/textView4"
        android:layout_width="wrap_content"
        android:layout_height="100dp"
        android:layout_marginStart="32dp"
        android:layout_marginTop="32dp"
        android:background="#bebebe"
        android:text="TextView"
        app:layout_constraintStart_toStartOf="parent"
        app:layout_constraintTop_toTopOf="parent" />

    <TextView
        android:id="@+id/textView5"
        android:layout_width="wrap_content"
        android:layout_height="100dp"
        android:layout_marginTop="32dp"
        android:layout_marginEnd="32dp"
        android:background="#bebebe"
        android:text="TextView"
        app:layout_constraintEnd_toEndOf="parent"
        app:layout_constraintTop_toTopOf="parent" />

    <TextView
        android:id="@+id/textView6"
        android:layout_width="0dp"
        android:layout_height="wrap_content"
        android:layout_marginStart="16dp"
        android:layout_marginEnd="16dp"
        android:text="TextViewTextViewTextViewTextViewTextViewTextView"
        app:layout_constraintEnd_toStartOf="@+id/textView5"
        app:layout_constraintStart_toEndOf="@+id/textView4"
        tools:layout_editor_absoluteY="73dp" />

</androidx.constraintlayout.widget.ConstraintLayout>
2
3
4
5
6
7
8
9
10
11
12
13
14
15
16
17
18
19
20
21
22
23
24
25
26
27
28
29
30
31
32
33
34
35
36
37
38
39
40
41
在个例子的重点是将layout_width设置为0dp,即MATCH_CONSTRAINT,即可实现这样的效果。
下面进一步思考下这个场景。
当TextView文字较少时,可以发现其尺寸是默认占据了整个约束空间,这时候,如果要求TextView只显示文字大小,类似设置wrap_content的效果,但是在文字长的时候,又必须被边缘约束,所以又不能设置wrap_content,这种场景下,可以通过layout_constraintWidth_default属性来解决,它提供了边缘约束下默认的尺寸设置方式。
前面说的类似wrap_content的效果,就可以使用wrap来设置。
当然,不设置这个属性,将TextView的宽度设置为wrap_content,也是可以实现这个效果的,这就需要使用到前面讲的constrainedWidth属性了。
layout_constraintWidth_default的默认值为spread,即占据边缘约束下的所有空间。
# 使用准侧
下面为大家总结了使用ConstraintLayout的一些准则:
- 找准布局基准元素,一般是界面的固定不变的业务元素,其它组件,根据其约束来进行布局
- 使用Group等虚拟布局组件来简化布局代码
- 对ConstraintLayout的特性需要掌握熟练,特别是上面这些场景,需要手到擒来
- 修改ConstraintLayout时,先理清约束关系再下手,避免上手就拖组件,导致剪不断理还乱