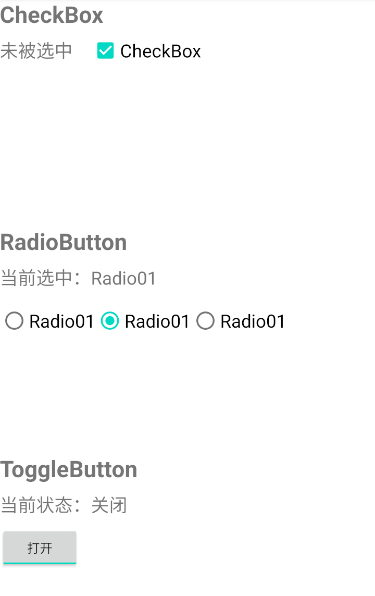
 CheckBox的使用
这三者都是Button的子类,都是处理与用户点击事件相关的控件
- CheckBox是选择框,只有选中和未选中的状态
- RadioButton是单选按钮,需要使用RadioGroup来组织一个或多个RadioButton;在同一个RadioGroup中,一次只能选中一个RadioButton
- ToggleButton是一个双选状态的选择按钮,只有开关两个场景
<?xml version="1.0" encoding="utf-8"?>
<LinearLayout xmlns:android="http://schemas.android.com/apk/res/android"
    xmlns:app="http://schemas.android.com/apk/res-auto"
    xmlns:tools="http://schemas.android.com/tools"
    android:layout_width="match_parent"
    android:layout_height="match_parent"
    android:orientation="vertical"
    tools:context=".MainActivity">

    <RelativeLayout
        android:layout_width="match_parent"
        android:layout_height="match_parent"
        android:layout_weight="10">

        <TextView
            android:id="@+id/cb_name_tv"
            android:layout_width="wrap_content"
            android:layout_height="wrap_content"
            android:text="CheckBox"
            android:textSize="25sp"
            android:textStyle="bold" />

        <TextView
            android:id="@+id/cb_tv"
            android:layout_width="wrap_content"
            android:layout_height="wrap_content"
            android:layout_below="@id/cb_name_tv"
            android:layout_marginTop="10dp"
            android:text="未被选中"
            android:textSize="20sp" />

        <CheckBox
            android:layout_width="wrap_content"
            android:layout_height="wrap_content"
            android:layout_alignBaseline="@id/cb_tv"
            android:layout_marginLeft="20dp"
            android:layout_toRightOf="@id/cb_tv"
            android:text="CheckBox"
            android:textSize="20dp" />

    </RelativeLayout>

    <RelativeLayout
        android:layout_width="match_parent"
        android:layout_height="match_parent"
        android:layout_weight="10">

        <TextView
            android:id="@+id/rb_name_tv"
            android:layout_width="wrap_content"
            android:layout_height="wrap_content"
            android:text="RadioButton"
            android:textSize="25sp"
            android:textStyle="bold" />

        <TextView
            android:id="@+id/rb_tv"
            android:layout_width="wrap_content"
            android:layout_height="wrap_content"
            android:layout_below="@id/rb_name_tv"
            android:layout_marginTop="10dp"
            android:text="当前选中:Radio01"
            android:textSize="20sp" />

        <RadioGroup
            android:id="@+id/radio_group"
            android:layout_width="match_parent"
            android:layout_height="match_parent"
            android:layout_below="@id/rb_tv"
            android:layout_marginTop="10dp"
            android:orientation="horizontal">

            <RadioButton
                android:id="@+id/radio01"
                android:layout_width="wrap_content"
                android:layout_height="wrap_content"
                android:text="Radio01"
                android:textSize="20sp" />

            <RadioButton
                android:id="@+id/radio02"
                android:layout_width="wrap_content"
                android:layout_height="wrap_content"
                android:text="Radio01"
                android:textSize="20sp" />

            <RadioButton
                android:id="@+id/radio03"
                android:layout_width="wrap_content"
                android:layout_height="wrap_content"
                android:text="Radio01"
                android:textSize="20sp" />

        </RadioGroup>

    </RelativeLayout>

    <RelativeLayout
        android:layout_width="match_parent"
        android:layout_height="match_parent"
        android:layout_weight="10">

        <TextView
            android:id="@+id/tb_name_tv"
            android:layout_width="wrap_content"
            android:layout_height="wrap_content"
            android:text="ToggleButton"
            android:textSize="25sp"
            android:textStyle="bold" />

        <TextView
            android:id="@+id/tb_tv"
            android:layout_width="wrap_content"
            android:layout_height="wrap_content"
            android:layout_below="@id/tb_name_tv"
            android:layout_marginTop="10dp"
            android:text="当前状态:关闭"
            android:textSize="20sp" />

        <ToggleButton
            android:layout_width="wrap_content"
            android:layout_height="wrap_content"
            android:layout_below="@id/tb_tv"
            android:layout_marginTop="10dp"
            android:textOff="关闭"
            android:textOn="打开" />

    </RelativeLayout>


</LinearLayout>
2
3
4
5
6
7
8
9
10
11
12
13
14
15
16
17
18
19
20
21
22
23
24
25
26
27
28
29
30
31
32
33
34
35
36
37
38
39
40
41
42
43
44
45
46
47
48
49
50
51
52
53
54
55
56
57
58
59
60
61
62
63
64
65
66
67
68
69
70
71
72
73
74
75
76
77
78
79
80
81
82
83
84
85
86
87
88
89
90
91
92
93
94
95
96
97
98
99
100
101
102
103
104
105
106
107
108
109
110
111
112
113
114
115
116
117
118
119
120
121
122
123
124
125
126
127
128
129
130
131
# 1 RadioButton单选按钮
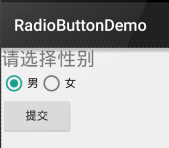
如题单选按钮,就是只能够选中一个,所以我们需要把RadioButton放到RadioGroup按钮组中,从而实现 单选功能!先熟悉下如何使用RadioButton,一个简单的性别选择的例子: 另外我们可以为外层RadioGroup设置orientation属性然后设置RadioButton的排列方式,是竖直还是水平~
效果图:
布局代码如下:
<LinearLayout xmlns:android="http://schemas.android.com/apk/res/android"
    xmlns:tools="http://schemas.android.com/tools"
    android:id="@+id/LinearLayout1"
    android:layout_width="match_parent"
    android:layout_height="match_parent"
    android:orientation="vertical"
    tools:context=".MainActivity" >

    <TextView
        android:layout_width="wrap_content"
        android:layout_height="wrap_content"
        android:text="请选择性别"
        android:textSize="23dp"/>

    <RadioGroup
        android:id="@+id/radioGroup"
        android:layout_width="wrap_content"
        android:layout_height="wrap_content"
        android:orientation="horizontal">

        <RadioButton
            android:id="@+id/btnMan"
            android:layout_width="wrap_content"
            android:layout_height="wrap_content"
            android:text="男"
            android:checked="true"/>

        <RadioButton
            android:id="@+id/btnWoman"
            android:layout_width="wrap_content"
            android:layout_height="wrap_content"
            android:text="女"/>
    </RadioGroup>

    <Button
        android:id="@+id/btnpost"
        android:layout_width="wrap_content"
        android:layout_height="wrap_content"
        android:text="提交"/>

</LinearLayout>
2
3
4
5
6
7
8
9
10
11
12
13
14
15
16
17
18
19
20
21
22
23
24
25
26
27
28
29
30
31
32
33
34
35
36
37
38
39
40
41
获得选中的值:
这里有两种方法,
第一种是为RadioButton设置一个事件监听器setOnCheckChangeListener
例子代码如下:
RadioGroup radgroup = (RadioGroup) findViewById(R.id.radioGroup);
        //第一种获得单选按钮值的方法
        //为radioGroup设置一个监听器:setOnCheckedChanged()
        radgroup.setOnCheckedChangeListener(new OnCheckedChangeListener() {
            @Override
            public void onCheckedChanged(RadioGroup group, int checkedId) {
                RadioButton radbtn = (RadioButton) findViewById(checkedId);
                Toast.makeText(getApplicationContext(), "按钮组值发生改变,你选了" + radbtn.getText(), Toast.LENGTH_LONG).show();
            }
        });
2
3
4
5
6
7
8
9
10
运行效果图: 

PS:另外有一点要切记,要为每个RadioButton添加一个id,不然单选功能会生效!!!
第二种方法是通过单击其他按钮获取选中单选按钮的值,当然我们也可以直接获取,这个看需求~
例子代码如下:
Button btnchange = (Button) findViewById(R.id.btnpost);
        RadioGroup radgroup = (RadioGroup) findViewById(R.id.radioGroup);
        //为radioGroup设置一个监听器:setOnCheckedChanged()
        btnchange.setOnClickListener(new OnClickListener() {
            @Override
            public void onClick(View v) {
                for (int i = 0; i < radgroup.getChildCount(); i++) {
                    RadioButton rd = (RadioButton) radgroup.getChildAt(i);
                    if (rd.isChecked()) {
                        Toast.makeText(getApplicationContext(), "点击提交按钮,获取你选择的是:" + rd.getText(), Toast.LENGTH_LONG).show();
                        break;
                    }
                }
            }
        });
2
3
4
5
6
7
8
9
10
11
12
13
14
15
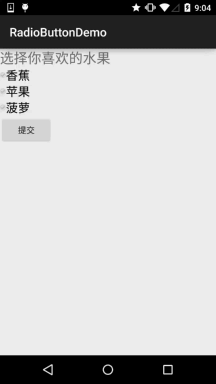
运行效果图:

代码解析: 这里我们为提交按钮设置了一个setOnClickListener事件监听器,每次点击的话遍历一次RadioGroup判断哪个按钮被选中我们可以通过下述方法获得RadioButton的相关信息!
- getChildCount( )获得按钮组中的单选按钮的数目;
- getChinldAt(i):根据索引值获取我们的单选按钮
- isChecked( ):判断按钮是否选中
# 2. CheckBox复选框
如题复选框,即可以同时选中多个选项,至于获得选中的值,同样有两种方式: 1.为每个CheckBox添加事件:setOnCheckedChangeListener 2.弄一个按钮,在点击后,对每个checkbox进行判断:isChecked();
运行效果图:

实现代码:
public class MainActivity extends AppCompatActivity implements View.OnClickListener,CompoundButton.OnCheckedChangeListener{

    private CheckBox cb_one;
    private CheckBox cb_two;
    private CheckBox cb_three;
    private Button btn_send;

    @Override
    protected void onCreate(Bundle savedInstanceState) {
        super.onCreate(savedInstanceState);
        setContentView(R.layout.activity_main);

        cb_one = (CheckBox) findViewById(R.id.cb_one);
        cb_two = (CheckBox) findViewById(R.id.cb_two);
        cb_three = (CheckBox) findViewById(R.id.cb_three);
        btn_send = (Button) findViewById(R.id.btn_send);

        cb_one.setOnCheckedChangeListener(this);
        cb_two.setOnCheckedChangeListener(this);
        cb_three.setOnCheckedChangeListener(this);
        btn_send.setOnClickListener(this);

    }

    @Override
    public void onCheckedChanged(CompoundButton compoundButton, boolean b) {
       if(compoundButton.isChecked()) Toast.makeText(this,compoundButton.getText().toString(),Toast.LENGTH_SHORT).show();
    }

    @Override
    public void onClick(View view) {
        String choose = "";
        if(cb_one.isChecked())choose += cb_one.getText().toString() + "";
        if(cb_two.isChecked())choose += cb_two.getText().toString() + "";
        if(cb_three.isChecked())choose += cb_three.getText().toString() + "";
        Toast.makeText(this,choose,Toast.LENGTH_SHORT).show();
    }
}
2
3
4
5
6
7
8
9
10
11
12
13
14
15
16
17
18
19
20
21
22
23
24
25
26
27
28
29
30
31
32
33
34
35
36
37
38
# 2.1 自定义点击效果
实现效果图如下:
PS:这里素材的原因,有点小...
<?xml version="1.0" encoding="utf-8"?>
<selector xmlns:android="http://schemas.android.com/apk/res/android">
    <item
        android:state_enabled="true"
        android:state_checked="true"
        android:drawable="@mipmap/ic_checkbox_checked"/>
    <item
        android:state_enabled="true"
        android:state_checked="false"
        android:drawable="@mipmap/ic_checkbox_normal" />
</selector>
2
3
4
5
6
7
8
9
10
11
写好后,我们有两种方法设置,也可以说一种吧!你看看就知道了~
①android:button属性设置为上述的selctor
android:button="@drawable/rad_btn_selctor"
②在style中定义一个属性,然后通过android style属性设置,先往style添加下述代码:
    <style name="MyCheckBox" parent="@android:style/Widget.CompoundButton.CheckBox">
        <item name="android:button">@drawable/rad_btn_selctor</item>
    </style>
2
3
然后布局那里:
style="@style/MyCheckBox"
# 2.2 改变文字与选择框的相对位置
这个实现起来也很简单,还记得我们之前学TextView的时候用到的drawableXxx吗? 要控制选择框的位置,两部即可!设置:
Step 1. android:button="@null"
Step 2. android:drawableTop="@android:drawable/btn_radio"
# 2.3 修改文字与选择框的距离
有时,我们可能需要调节文字与选择框之间的距离,让他们看起来稍微没那么挤,我们可以:
- 在XML代码中控制: 使用android:paddingXxx = "xxx" 来控制距离
- 在Java代码中,稍微好一点,动态计算paddingLeft!
示例代码如下:
rb.setButtonDrawable(R.drawable.rad_btn_selctor);
int rb_paddingLeft = getResources().getDrawable(R.mipmap.ic_checkbox_checked).getIntrinsicWidth()+5;
rb.setPadding(rb_paddingLeft, 0, 0, 0);
2
3
# 3. ToggleButton
# 3.1 ToggleButton
可供我们设置的属性:
- android:disabledAlpha:设置按钮在禁用时的透明度
- **android:textOff:**按钮没有被选中时显示的文字
- **android:textOn:**按钮被选中时显示的文字 另外,除了这个我们还可以自己写个selector,然后设置下Background属性即可~
# 3.2 Switch开关
可供我们设置的属性:
- **android:showText:**设置on/off的时候是否显示文字,boolean
- **android:splitTrack:**是否设置一个间隙,让滑块与底部图片分隔,boolean
- **android:switchMinWidth:**设置开关的最小宽度
- **android:switchPadding:**设置滑块内文字的间隔
- **android:switchTextAppearance:**设置开关的文字外观,暂时没发现有什么用...
- **android:textOff:**按钮没有被选中时显示的文字
- **android:textOn:**按钮被选中时显示的文字
- **android:textStyle:**文字风格,粗体,斜体写划线那些
- **android:track:**底部的图片
- **android:thumb:**滑块的图片
- android:typeface:设置字体,默认支持这三种:sans, serif, monospace;除此以外还可以使用 其他字体文件(.ttf*),首先要将字体文件保存在assets/fonts/目录下,不过需要在Java代码中设置:
Typeface typeFace = Typeface.createFromAsset(getAssets(),"fonts/HandmadeTypewriter.ttf"); textView.setTypeface(typeFace);
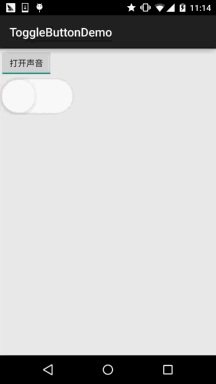
# 3.3 ToggleButton使用示例
因为比较简单,所以我们把他们写到一起,另外,我们为Switch设置下滑块和底部的图片,实现 一个类似于IOS 7的滑块的效果,但是有个缺点就是不能在XML中对滑块和底部的大小进行设置, 就是素材多大,Switch就会多大,我们可以在Java中获得Drawable对象,然后对大小进行修改, 简单的例子:
运行效果图:
实现代码: 先是两个drawable的文件: thumb_selctor.xml:
<?xml version="1.0" encoding="utf-8"?>
<selector xmlns:android="http://schemas.android.com/apk/res/android">
    <item android:state_pressed="true" android:drawable="@drawable/switch_btn_pressed"/>
    <item android:state_pressed="false" android:drawable="@drawable/switch_btn_normal"/>
</selector>
2
3
4
5
track_selctor.xml:
<?xml version="1.0" encoding="utf-8"?>
<selector xmlns:android="http://schemas.android.com/apk/res/android">
    <item android:state_checked="true" android:drawable="@drawable/switch_btn_bg_green"/>
    <item android:state_checked="false" android:drawable="@drawable/switch_btn_bg_white"/>
</selector>
2
3
4
5
布局文件:activity_main.xml:
<LinearLayout xmlns:android="http://schemas.android.com/apk/res/android"
    xmlns:tools="http://schemas.android.com/tools"
    android:layout_width="match_parent"
    android:layout_height="match_parent"
    android:orientation="vertical"
    tools:context=".MainActivity">

    <ToggleButton
        android:id="@+id/tbtn_open"
        android:layout_width="wrap_content"
        android:layout_height="wrap_content"
        android:checked="true"
        android:textOff="关闭声音"
        android:textOn="打开声音" />

    <Switch
        android:id="@+id/swh_status"
        android:layout_width="wrap_content"
        android:layout_height="wrap_content"
        android:textOff=""
        android:textOn=""
        android:thumb="@drawable/thumb_selctor"
        android:track="@drawable/track_selctor" />

</LinearLayout>
2
3
4
5
6
7
8
9
10
11
12
13
14
15
16
17
18
19
20
21
22
23
24
25
MainActivity.java:
public class MainActivity extends AppCompatActivity implements CompoundButton.OnCheckedChangeListener{

    private ToggleButton tbtn_open;
    private Switch swh_status;

    @Override
    protected void onCreate(Bundle savedInstanceState) {
        super.onCreate(savedInstanceState);
        setContentView(R.layout.activity_main);

        tbtn_open = (ToggleButton) findViewById(R.id.tbtn_open);
        swh_status = (Switch) findViewById(R.id.swh_status);
        tbtn_open.setOnCheckedChangeListener(this);
        swh_status.setOnCheckedChangeListener(this);
    }

    @Override
    public void onCheckedChanged(CompoundButton compoundButton, boolean b) {
        switch (compoundButton.getId()){
            case R.id.tbtn_open:
                if(compoundButton.isChecked()) Toast.makeText(this,"打开声音",Toast.LENGTH_SHORT).show();
                else Toast.makeText(this,"打开声音",Toast.LENGTH_SHORT).show();
                break;
            case R.id.swh_status:
                if(compoundButton.isChecked()) Toast.makeText(this,"开关:ON",Toast.LENGTH_SHORT).show();
                else Toast.makeText(this,"开关:OFF",Toast.LENGTH_SHORT).show();
                break;

        }
    }
}
2
3
4
5
6
7
8
9
10
11
12
13
14
15
16
17
18
19
20
21
22
23
24
25
26
27
28
29
30
31