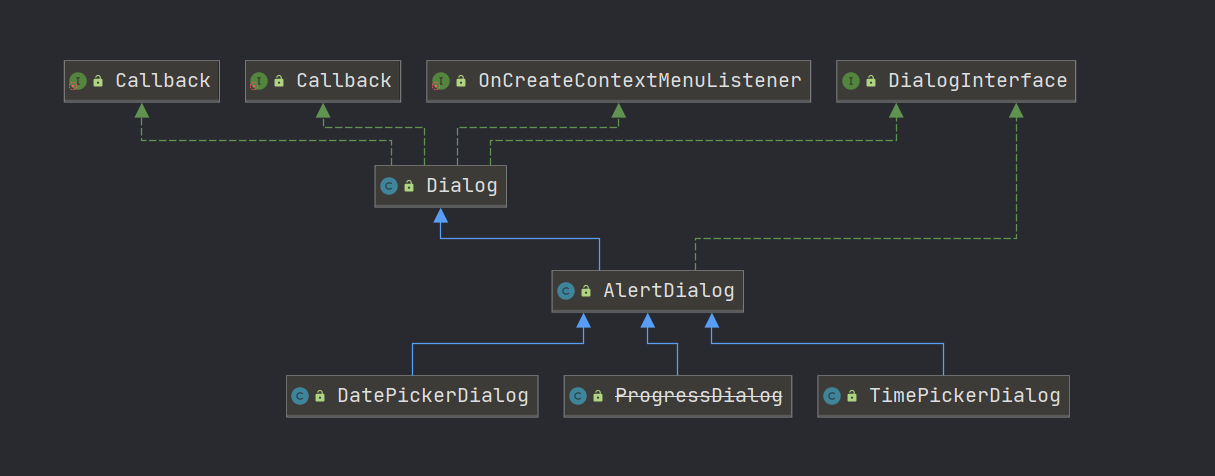
 Dialog
# Dialog
创建对话框的一般步骤:
- 创建
AlertDialog.Builder对象 - 设置图标、标题、内容按钮等区域
- 调用
creat()方法创建(可省略,如果没有直接创建) - 调用
show()显示对话框
# AlertDialog
没有公开的构造方法,只能通过内部类Builder来创建
new AlertDialog.Builder(this).create().show();
AlertDialog.Builder:
- create(): 创建AlertDialog对象
- show(): 创建AlertDialog对象,同时将其显示出来
- setTitle(CharSequence title): 设置标题
- setIcon():设置icon
- setMessage(CharSequence message): 设置内容
- setPositiveButton(String text,OnClickListener listener): 设置正面按钮(确认)
- setNegativeButton(String text,OnClickListener listener): 设置负面按钮(取消)
- setView():设置自定义View
- setSingleChoiceltems(...):设置单选项列表
- setMultiChoiceltems(...):设置多选项列表
- dismiss(): 移除dialog
# 显示单选列表
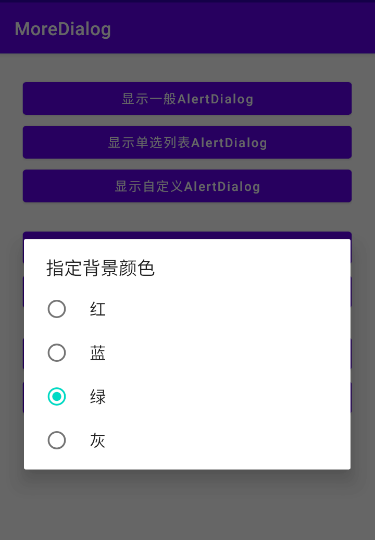
在定义String数组时一定要加final,final的变量在方法执行完后还存在(拷贝一封放到常量池中)
public void showLD(View v) {
    // final的变量在方法执行完后还存在(拷贝一封放到常量池中)
    final String[] items = {"红", "蓝", "绿", "灰"};
    new AlertDialog.Builder(this)
            .setTitle("指定背景颜色")
            .setSingleChoiceItems(items, 2, new DialogInterface.OnClickListener() {
                @Override
                public void onClick(DialogInterface dialog, int which) {
                    // 提示颜色
                    Toast.makeText(MainActivity.this, items[which], Toast.LENGTH_SHORT).show();
                    //移除dilaog
                    dialog.dismiss();
                }
            })
            .show();
}
2
3
4
5
6
7
8
9
10
11
12
13
14
15
16
# 自定义AlertDialog
自定义对话框实现步骤:
- 自定义XML布局文件
- 获取LayoutInflater对象
- 调用
inflate()方法获取View对象 - 调用Builder对象
setView()方法设置View - 获取输入内容或监听点击事件
DialogBuilder:setView(View view) 设置Dialog中的视图
View: View inflate(Context, context, int resource, ViewGroup root) 动态加载布局文件得到View
# View.inflate()
Inflate可用于将一个xml中定义的布局控件找出来. 因为在一个Activity里如果直接用findViewById()的话,对应的是setConentView()的那个layout里的组件。因此如果当前Activity里需要用到别的layout(xml文件),比如对话框上的layout,这时还要设置对话框上的layout里的组件(像图片ImageView,文字TextView)上的内容。所以,就必须用inflate()先将对话框的layout找出来,然后再用这个layout对象去找到它上面的组件,如:
View view = View.inflate(this, R.layout.dialog_layout, null);
TextViewdialogTV = (TextView) view.findViewById(R.id.dialog_tv);
dialogTV.setText("abcd");
2
3
如果直接用this.findViewById(R.id.dialog_tv)肯定会报错
生成LayoutInflater的方法:
上文示例中写的方法来创建inflate一般不常用,一般通过LayoutInflater来创建inflate。
主要有三种方式可以生成LayoutInflater:
LayoutInflater inflater =(LayoutInflater)context.getSystemService(Context.LAYOUT_INFLATER_SERVICE);
View layout = inflater.inflate(R.layout.main, null);

LayoutInflater inflater = LayoutInflater.from(context);
2
3
4
# 显示自定义AlertDialog
/**
 * 显示自定义AlertDialog
 * @param v
 */
public void showCD(View v) {
    // 动态加载布局文件, 得到对应的View对象
    View view = View.inflate(this, R.layout.dialog_view, null); // 此处与该Activity的布局无关,故为null
    // 问题1: view的真实类型? --是布局文件根标签的类型(如LinearLayout), 包含了子View对象
    /**
     * 问题2: 如何得到一个独立View的子View?  view.findViewById(id)
     *  findViewById(id)是在setContentView()中的View中找
     */
    final EditText nameET = view.findViewById(R.id.et_dialog_name);
    final EditText pwdET = view.findViewById(R.id.et_dialog_pwd);
    new AlertDialog.Builder(this)
            .setView(view)
            .setNegativeButton("取消", new DialogInterface.OnClickListener() {
                @Override
                public void onClick(DialogInterface dialog, int which) {
                    Toast.makeText(MainActivity.this, "取消操作", Toast.LENGTH_SHORT).show();
                }
            })
            .setNegativeButton("确定", new DialogInterface.OnClickListener() {
                @Override
                public void onClick(DialogInterface dialog, int which) {
                    //读取用户名和密码
                    String username = nameET.getText().toString();
                    String password = pwdET.getText().toString();
                    Intent intent = new Intent(MainActivity.this, SecondActivity.class);
                    intent.putExtra("username", username);
                    intent.putExtra("password", password);
                    startActivity(intent);
                    //提示
                    Toast.makeText(MainActivity.this, username + " : " + password, Toast.LENGTH_SHORT).show();
                }
            })
            .show();
}
2
3
4
5
6
7
8
9
10
11
12
13
14
15
16
17
18
19
20
21
22
23
24
25
26
27
28
29
30
31
32
33
34
35
36
37
38
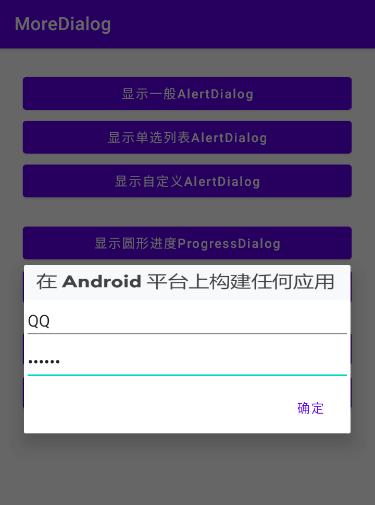
# 圆形进度条对话框

    /**
     * 显示圆形进度ProgressDialog
     * 回调方法: 主线程执行
     *
     * @param v
     * @throws InterruptedException
     */
    public void showPD(View v) {
        final ProgressDialog progressDialog = ProgressDialog.show(this, "数据加载", "数据加载中");
        // 模拟耗时操作,但是一定要在子线程中执行
        new Thread() {
            @Override
            public void run() {
                for (int i = 0; i < 20; i++) {
                    try {
                        Thread.sleep(100);
                    } catch (InterruptedException e) {
                        e.printStackTrace();
                    }
                }
                //移除dialog
                progressDialog.dismiss(); //方法在分线程执行, 但内部使用Handler实现主线程移除dialog,所以不需要放到UI线程

                // Toast.makeText(MainActivity.this, "加载完成了!!!", Toast.LENGTH_SHORT).show();

                // 不能在分线程直接更新UI(Toast)
                runOnUiThread(new Runnable() {
                    @Override
                    public void run() {
                        Toast.makeText(MainActivity.this, "加载完成了!!!", Toast.LENGTH_SHORT).show();
                    }
                });
            }
        }.start();
    }
2
3
4
5
6
7
8
9
10
11
12
13
14
15
16
17
18
19
20
21
22
23
24
25
26
27
28
29
30
31
32
33
34
35
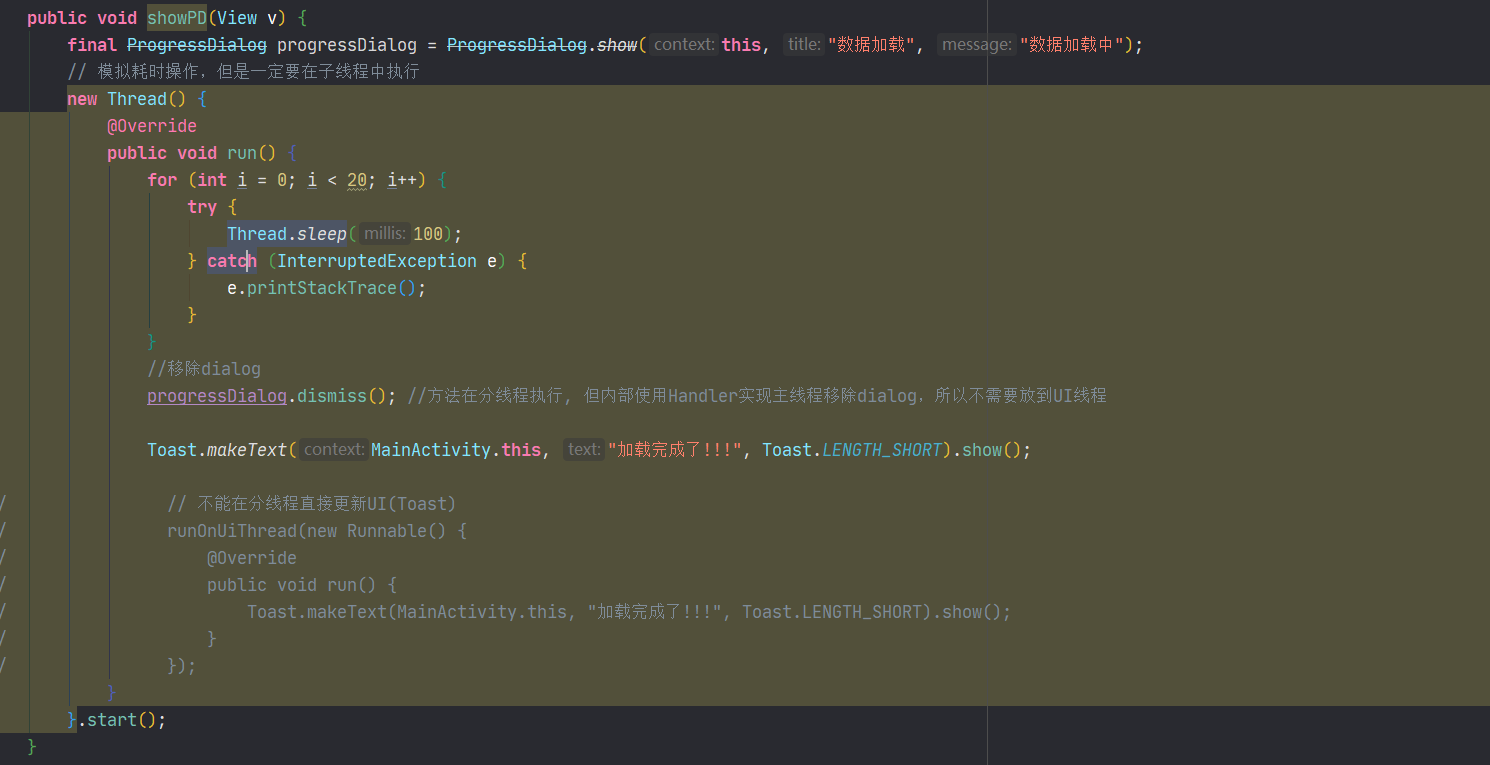
Toast不能放到子线程中去执行
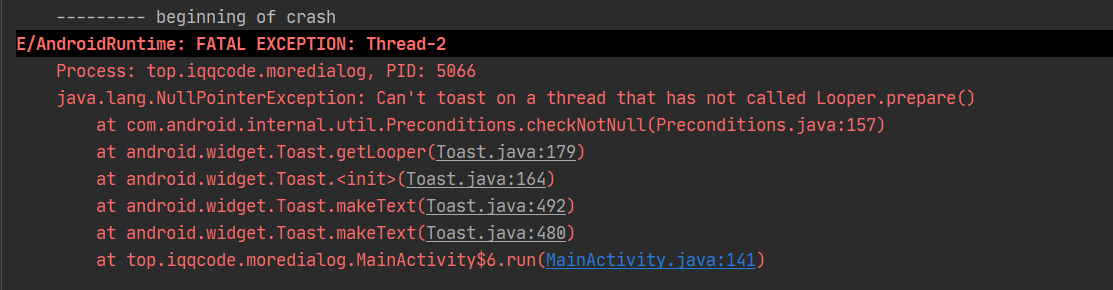
progressDialog.dismiss(); 方法在分线程执行, 但内部使用Handler实现主线程移除dialog,所以不需要放到UI线程
# 水平进度条对话框
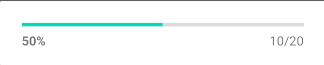
public void showPD2(View v) {
        // 1. 创建Dialog对象
        final ProgressDialog dialog = new ProgressDialog(this);
        // 2. 设置样式
        dialog.setProgressStyle(ProgressDialog.STYLE_HORIZONTAL);
        // 3. 显示
        dialog.show();
        // 4. 启动分线程, 加载数据, 并显示进度, 当加载完成移除dialog
        new Thread(new Runnable() {
            @Override
            public void run() {
                int count = 20;
                // 设置最大进度
                dialog.setMax(count);
                for (int i = 0; i < count; i++) {
                    try {
                        Thread.sleep(100);
                    } catch (InterruptedException e) {
                        e.printStackTrace();
                    }
                    dialog.setProgress(dialog.getProgress() + 1);
                }
                // 移除dialog
                dialog.dismiss();

                runOnUiThread(new Runnable() {
                    @Override
                    public void run() {
                        Toast.makeText(MainActivity.this, "加载完成了!!!", Toast.LENGTH_SHORT).show();
                    }
                });
            }
        }).start();
    }
2
3
4
5
6
7
8
9
10
11
12
13
14
15
16
17
18
19
20
21
22
23
24
25
26
27
28
29
30
31
32
33
34
# 日期Dialog
/**
     * 日期Dialog
     *
     * @param v
     */
    public void showDateAD(View v) {
        //创建日历对象
        Calendar calendar = Calendar.getInstance();
        //得到当前的年月日
        int year = calendar.get(Calendar.YEAR); //得到年份
        int month = calendar.get(Calendar.MONTH); // 得到月份
        int dayOfMonth = calendar.get(Calendar.DAY_OF_MONTH); // 得到天
        Log.e("TAG", year + "-" + month + "-" + dayOfMonth);

        new DatePickerDialog(this, new OnDateSetListener() {
            @Override
            public void onDateSet(DatePicker view, int year, int monthOfYear, int dayOfMonth) {
                Log.e("TAG", year + "--" + (monthOfYear + 1) + "--" + dayOfMonth);
            }
        }, year, month, dayOfMonth).show();
    }

    /**
     * 分秒
     * @param v
     */
    public void showTimeAD(View v) {
        Calendar calendar = Calendar.getInstance();
        int hour = calendar.get(Calendar.HOUR_OF_DAY);
        int minute = calendar.get(Calendar.MINUTE);
        Log.e("TAG", hour + " : " + minute);
        new TimePickerDialog(this, new OnTimeSetListener() {
            @Override
            public void onTimeSet(TimePicker view, int hourOfDay, int minute) {
                Log.e("TAG", hour + " : " + minute);
            }
        }, hour, minute, true).show();
    }
2
3
4
5
6
7
8
9
10
11
12
13
14
15
16
17
18
19
20
21
22
23
24
25
26
27
28
29
30
31
32
33
34
35
36
37
38
# 使用PopupWindow弹窗的实现步骤
- 自定义XML文件
- 获取LayoutInflater对象
- 调用
inflate()方法获取View对象 - 创建PopupWindow对象
- 调用PopupWindow的
showAsDropDown或者showAsLocation方法显示对话框窗口
# 案例:实现程序退出确认框
需求:
- 在用户按下回退键是,弹出确认框
- 按取消留在原界面,按确定退出程序
分析:
- 首先找到引发退出的动作(事件)
- 在改事件中编写代码,弹出确认对话框
- 在确定按钮事件中终止当前程序
- 在取消按钮事件中使原有的退出流程无效化
实现步骤:
- 重写onBackPressed方法
- 去除原有的父类方法
- 编写确认对话框
- 在确定事件里调用
finish()来结束程序
    @Override
    public void onBackPressed() {
        new AlertDialog.Builder(this)
                .setIcon(R.mipmap.ic_launcher_round)
                .setTitle("🎨确认退出吗,亲亲~")
                .setPositiveButton("确定", new DialogInterface.OnClickListener() {

                    @Override
                    public void onClick(DialogInterface dialog, int which) {
                        finish();
                    }
                })
                .setNegativeButton("不走了", null)
                .show();
    }
2
3
4
5
6
7
8
9
10
11
12
13
14
15
# 小结
消息对话框是所有对话框的基本类型
对话框的创建须通过AlertDialog.Builder来完成
单选对话框需要用变量来记录用户的选择
多选对话框需要用集合来记录用户的选择
在编写对话框中按钮事件时要特别注意变量作用域的问题,通常用
final修饰符可以解决,或者声明成为当前类的属性(item上Button点监听,接口作为属性值传入)